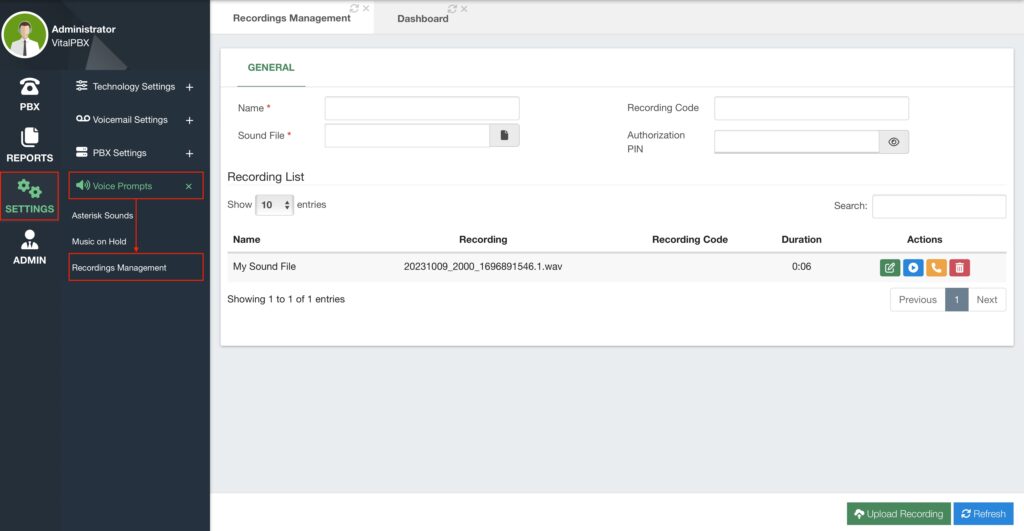
In multiple modules, you are able to have custom recordings used for announcements or prompts. You can upload your own sound files to playback in the different modules. To upload your own sound files we must go to Settings > Voice Prompts > Recordings Management.
Before we upload a sound file, let’s talk about the sound file format. It does not really matter the format you use as VitalPBX will automatically convert the sound file to the appropriate format. But, it helps with volume levels and clarity if you upload a file that is already using the appropriate format. The format goes as follows.
- 8,000 Hz
- 16-bit PCM
- WAV file
- A-LAW algorithm
You can use any audio processing software to convert this sound file, Audacity™ is a free open-source software that we have used to create these sound files.
With your sound file created, we can now go back to the Recordings Management module. Here, we will enter a Name for our recording, select the Sound File we have created, and click on the green Upload Recording button in the lower right-hand corner. And Apply Changes.
Optionally, you can enter a Recording Code so you can re-record the sound file from any extension, and add an Authorization PIN, to protect the recording from being re-recorded by anyone.
You can now use the sound file in various modules as we saw in Queues, Queues Callbacks, Extensions, and in any other module that uses custom audio files.
In the bottom section, you can see your Recording List. This will display information about the different recordings and sound files you have, including their Name, Recording Sound File, Recording Code, and Duration.
Additionally, you have some actions you can take over these recordings. You can edit them to change their Name, Recording code, and Authorization PIN. You can play the recording back and download the file. With the yellow handset icon, you can prompt an extension to re-record the sound file. And with the red trash bin icon, you can delete the recording.
Additionally, you can record these files from any extension using the feature code *92. This feature code will allow you to record sound files directly so you can use them for the various prompts in VitalPBX. There’s also a blue Refresh button in the lower right-hand corner to refresh the list. This way you can see the latest recording you have done.


