Next up we have Call Parking. Call parking is best understood if you think of it as a literal parking lot, where you can park ongoing calls into spaces within the parking lot. By default, we have the Default Parking 700 with 10 spaces available. To create a Parking, you must go to PBX > Applications > Parking.
The first thing you will need to establish is the Code for this parking. The code works a little bit differently with parking. The code is used to reach the parking lot as a whole. The parking spaces start from the next number from your code and are defined by the number of Parking Positions you establish. For example, if you set the code to 900 and define 10 parking positions, your parking spaces are from 901 to 910. You can leave the rest of the fields with the default values and Save and Apply Changes.
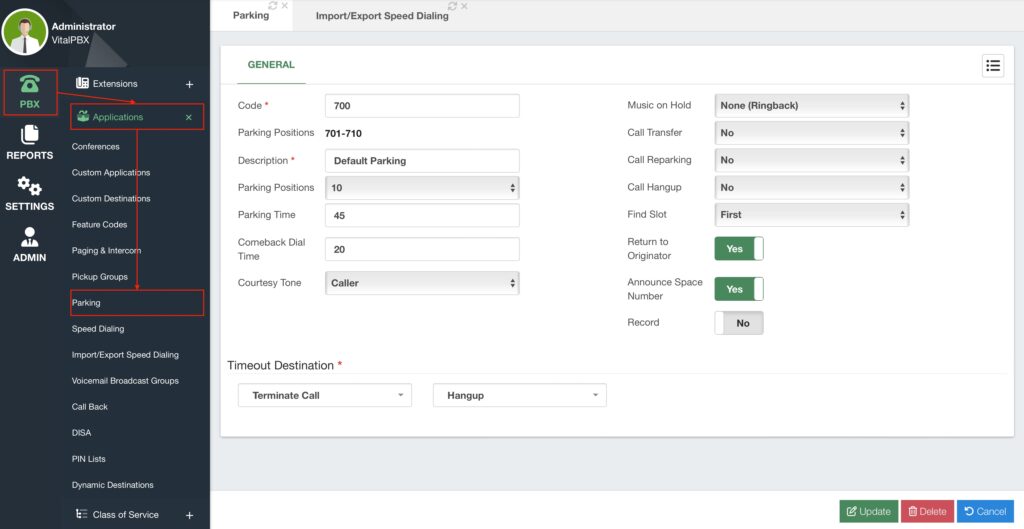
Additionally, you can configure the following options.
- Parking Time – This is the amount of time in seconds a call can stay in a parking lot
before returning. - Comeback Dial Time – This is the amount of time in seconds a parked call will dial
the device that originally parked the call after timing out in the parking space. - Courtesy Tone – This option will play back a courtesy tone when picking up a parked
call. This can playback to the caller, the callee, or both. - Music on Hold – This is the Music on Hold class that plays while in a parking space.
- Call Transfer – This is used to specify who can execute a DTMF-based transfer in the
call when picking up a parked call. You can choose between the caller, the callee,
both, or no. - Call Re-Parking – This is used to specify who can execute DTMF-based parking in
the call when picking up a parked call. You can choose between the caller, the callee,
both, or no. - Call Hangup – This is used to specify who can execute a DTMF-based hangup in the
call when picking up a parked call. You can choose between the caller, the callee,
both, or no. - Find Slot – This is the order in which the calls get parked. You can choose to use the
first available position or use the next position based on the last space position used. - Return to Originator – If this is enabled, after the parked call times out it will return to
the device that parked the call. If it is disabled, the call will be taken to the Timeout
Destination. - Announce Space Number – If enabled, the system will announce the parking
position in which the call was parked in. - Record – If enabled, this will record the parked call.
To use the call parking you have a couple of options. If you use the feature code *4 this will park the call using the Default Parking. The parking position used will be based on the Find Slot option you chose. If you have to Announce Space Number enabled, you will hear the parking position in which the call was parked. You can then call this parking space position from any device to retrieve the parked call.
You can also transfer calls to a specific parking position. For example, you can blind transfer a call to parking position 705. Now, anyone can dial 705 to retrieve the parked call.
Parking positions can be set to BLF keys with devices that support monitoring parking spaces. This way, you can monitor the parking space from your device and retrieve parked calls in that space with a single button press. This same BLF key can be used to park calls as well.
Call Parking is a nice way to set an ongoing call aside and retrieve it from any device. This is similar to how calls were placed on hold in traditional PBX systems, and anyone on the same server can retrieve the call.


