To start configuring your extensions, we will go to PBX > Extensions > Extensions.
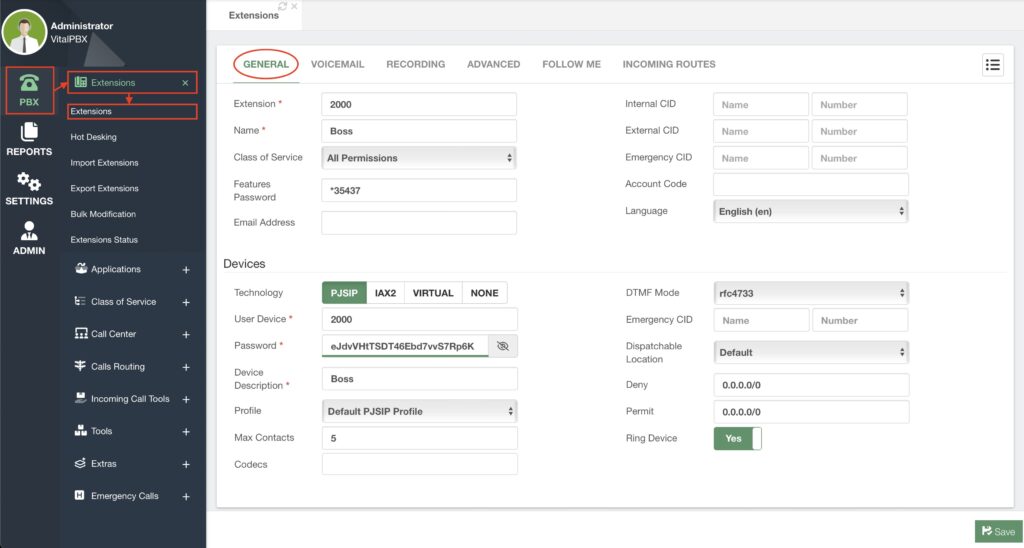
We will see the general configurations for our extensions on the General tab. Here we can create the extension number and its devices.
With VitalPBX, we use a multi-device technology so you can have multiple devices for the same extension number.
This is why the extensions module general tab is divided into the extension number and the devices section.
Let’s begin by adding an Extension Number in the Extension Number Section. This number can be any set of numbers of the length you desire.
Then, add a Name to identify this extension and select a Class of Service. We will go more into classes of service in a later section.

Next, you can add an Email Address. This email address is used to notify the extension user or users, send them a Welcome Email, and use the Voicemail to Email feature. We will see later how to modify the welcome email.
You then have the Internal, External, and Emergency caller IDs. You can leave these blank. The Internal CID will populate with the extension name and number. You can customize the External and Emergency CIDs for outgoing calls through a Trunk. Later on, we will go more into how Emergency CIDs work. Finally, you can set the Language for the voice prompts for this extension.
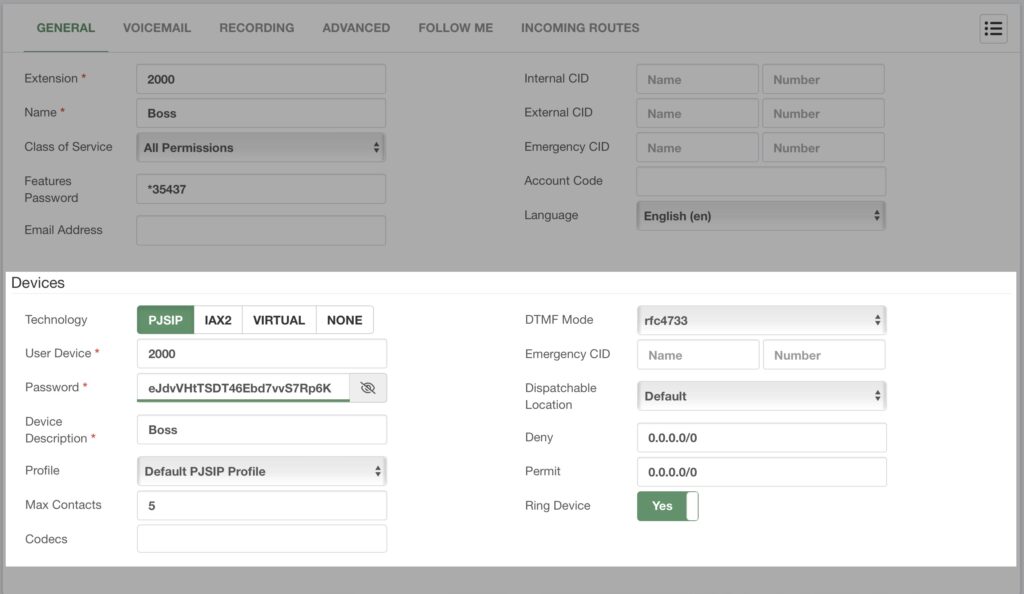
Now, we can move over to the Device Section. Here we can create the user and password to register to our PBX. This device will be associated with the extension number above. So, whenever the extension number is dialed, this device will ring.
Note…
With VitalPBX 4 and onward, we have moved entirely into a PJSIP
environment instead of SIP. This is due to SIP being deprecated from the
latest Asterisk versions and no longer supported.
This means that PJSIP uses port 5060 with every VitalPBX 4 installation by
default.
Every SIP-based device will work with a PJSIP device created in VitalPBX. So
there is no need to worry about compatibility with your existing or newer
devices.
IAX2 is another classic device type for Asterisk. Virtual devices can be any destination number, i.e., a cellphone number, that will be dialed when the extension number is called. None is when you want to create an extension with no device. This is useful when you want to make a Virtual Extension that is used as a common Voicemail destination, for example.
Once we have selected our preferred technology, we can enter our User Device and Password. This is the username and password we will use to register our device. By default, a random password is generated. We can then add a Description to identify the device.
Next, we can select a Device Profile. We will go more into what this is later on.
We can also choose the number of Max Contacts that can register using the same user device and password we created previously. With PJSIP, you can have multiple registrations for the same user device.
You can then choose specific Codecs for your device. All available codecs will be used if you leave this blank.
Then, you can change the DTMF Mode on the right side if necessary.
It is possible to assign a device-specific Emergency CID and a Dispatchable Location. We will go further into these options in the Emergency Calls section.
Next, we have the Deny and Permit fields. Here, you can enter specific IP addresses or network segments where you can or cannot register to this User Device.
And finally, we can enable or disable Ring Device. This is a Multi-Device PBX system, so you might have multiple devices with the same extension number. So, you can choose which ones can ring.
With everything entered, click Save, and don’t forget to Apply Changes.
You don’t need to complete every single field to create an extension. By simply entering an extension number and name, the rest of the areas are populated and can be left by default.
You can return to the extension from the list in the top right-hand corner with the extension and device created.
While editing the extension, you will see that there is now a device drop-down menu.
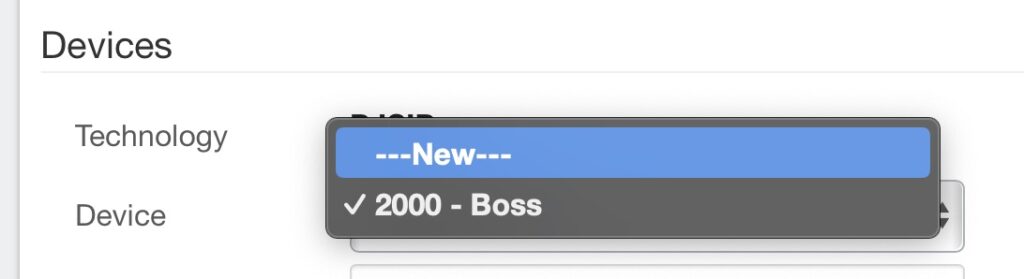
Click on New to add another device to the same extension number.
You will also see a Remove Device button in the lower left-hand corner. This will remove a device from the extension. The device will now appear on the Hot Desking module, but we will see more about Hot Desking later.
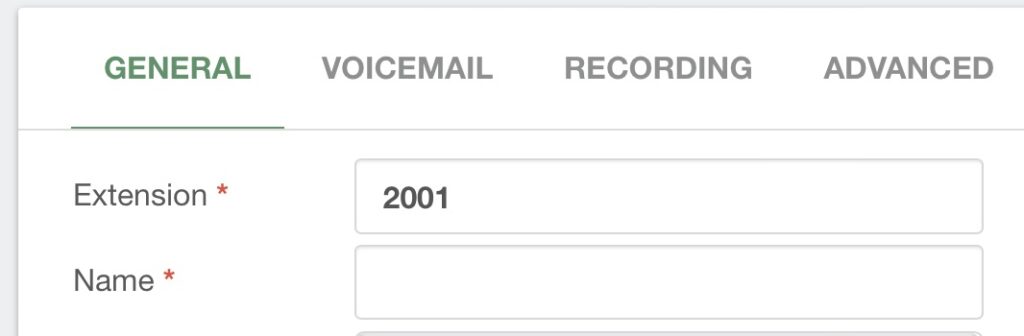
Now that you have an extension number, whenever you create a new extension, you will see that the Extension field is populated with the following sequential number based on the extension number based on the extension number you have used.
If you enter an existing extension number, you will be taken to the edit page for that extension.
With this, you have created your first extension. Congratulations! We can configure some other features to make them more complex.


