Sometimes, you might need to have remote access and registration for your VitalPBX installation. This might be a local installation that you don’t want to fully expose to the internet. For this, we have the OpenVPN commercial add-on that allows you to turn your VitalPBX server into a VPN server.
The OpenVPN add-on is a commercial add-on module, meaning that you will need to purchase an individual license for this module, or any of our licensing plans.
First, install the add-on from the add-ons module at Admin > Add-Ons > Add-Ons. Once installed, refresh your browser and go to Admin > Network > OpenVPN Server.
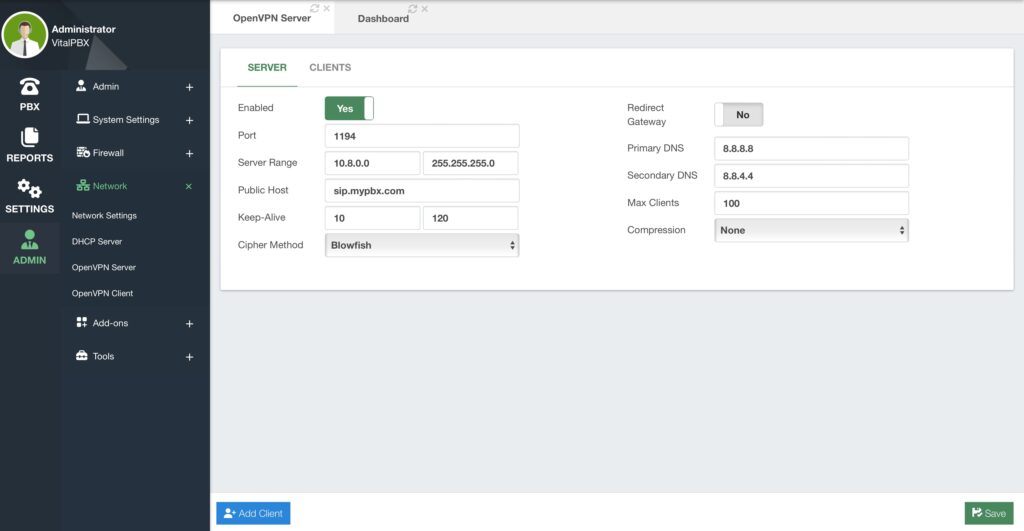
Next, you must Enable the service. By default, the module comes with Port 1194 configured.
You can change this to anything of your liking. Remember, this needs to be changed on the Firewall services as well under Admin > Firewall > Services. You can set a range of IP addresses to be assigned to the clients by entering a network with the appropriate netmask for the number of clients you wish to create.
Afterward, you must enter the Public Host. This will be the Public IP Address to reach your VitalPBX installation or an FQDN that points to this server.
Then, set the DNS servers to use. By default, Google’s© DNS servers are used. Lastly, we recommend setting the compression to comp-lzo. Click Save and then Apply Changes. Optionally, you can set the following options.
- Keep Alive – This option sends a ping-like message through the connection to see if
the connection with the client is still active. You can set the minimum and maximum
times for this ping in seconds. - Cipher Method – This is the cipher algorithm to encrypt the data.
- Redirect Gateway – If this option is enabled, all network traffic will go through the
OpenVPN server. This is good if you want to use the outbound connection and public
IP address of the VitalPBX Server. Keep this in mind based on your server’s
bandwidth’s limits. - Max Clients – This is the maximum number of concurrently connected clients.
With the service enabled, and reachable through the Public Host, you can start creating the certificates for your clients. For this, click the Add Client button in the lower left-hand corner.
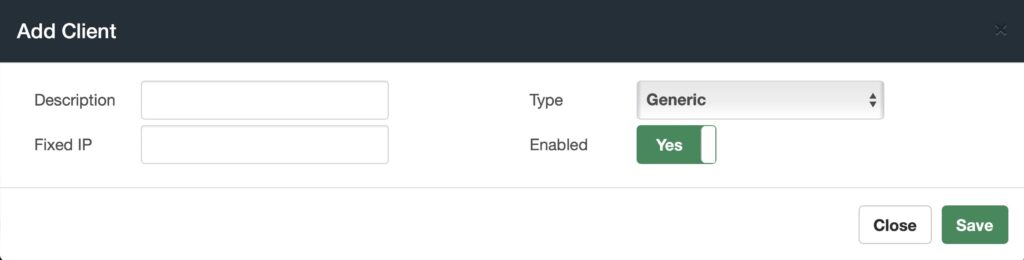
Here, you must enter a Description to identify this certificate for the client. Optionally, you can enter a Fixed IP address that will be assigned to the client. You can Enable or Disable this client at any time. Finally, you must select the type of certificate you want to create for this client. You can chose between the following options.
- Generic – This is best for devices like computers or mobile phones. You can use the
OpenVPN Connect application to upload the certificate and connect to this VPN
server. - Grandstream – This is a special certificate created for Grandstream devices.
- Fanvil – This is a special certificate created for Fanvil devices.
- Yealink – This is a special certificate created for Yealink devices.
- VitalPBX – This is a special certificate for other VitalPBX installations you want to
connect to this OpenVPN server.
Once you have configured these fields, click Save and Apply Changes.
Under the Clients tab, you will see the different Clients you have created.
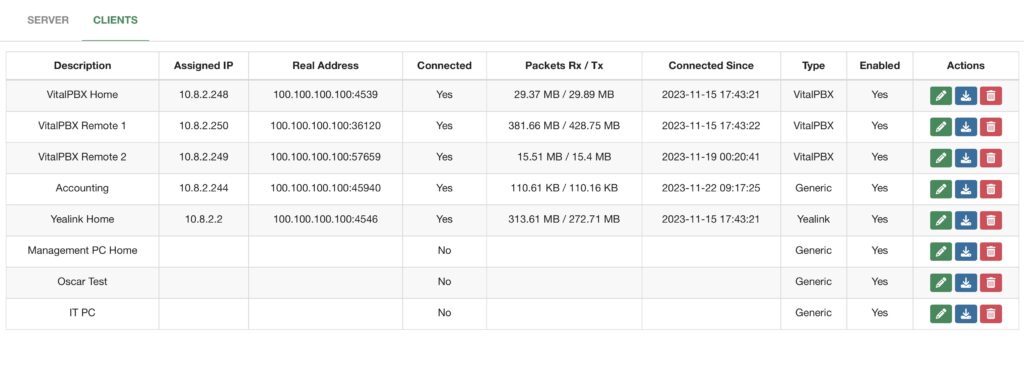
Here you can see relevant information about the client’s connection, as well as their type, and whether or not they are enabled. In the last column, you will see some actions you can take over the clients. You can delete or edit the client, as well as download the certificate files.
The files will differ based on the type of client you selected. You can then upload the certificate to the appropriate device based on the client type.
The device will then connect to the OpenVPN server we have just configured.
One of the client types we saw at the OpenVPN server module, was the VitalPBX client type. This can be uploaded on other VitalPBX installations with internet access to connect to this VPN. To use this, on the remote VitalPBX server, we must go to Admin > Network > OpenVPN Client. Here, you can upload the VPN Configuration, which is the certificate we created at the OpenVPN Server. Once selected, click the green Upload Configuration button in the lower right-hand corner.
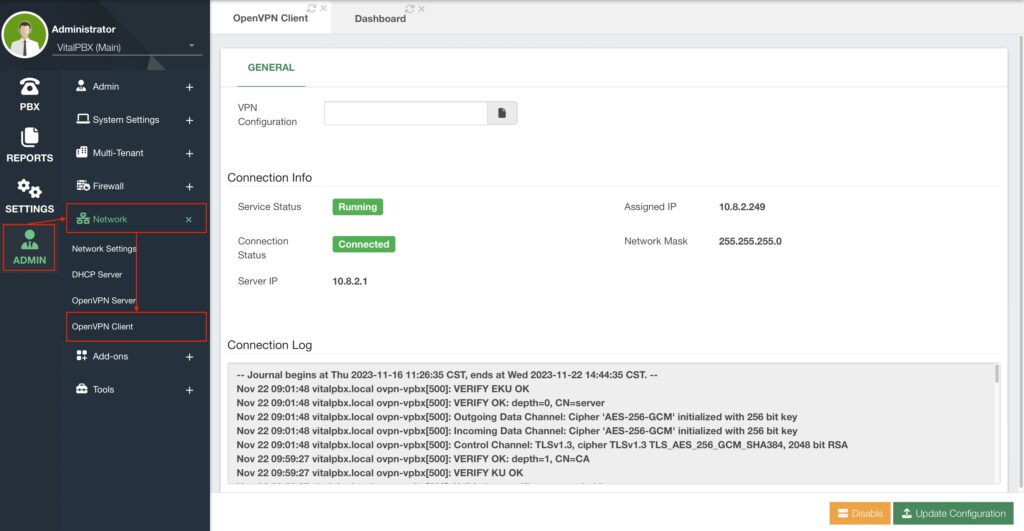
Once uploaded, the remote VitalPBX installation will connect to the OpenVPN server and have
an IP address assigned. This is very useful when you have a VitalPBX server in a remote location with no public IP address available. You will now have a secure encrypted tunnel between the remote VitalPBX server and the one with the OpenVPN server. Through this tunnel, you can create trunks to connect both systems in a secure manner.


