One of the most popular tools in Enterprise businesses nowadays is Microsoft© Teams™. Since this is a popular collaborative tool, we have created an add-on that integrates your Teams users with VitalPBX. This brings multiple benefits, including the ability to place outbound calls from Teams to a VoIP provider, have Teams users call regular Extension devices and more.
The MS Teams Connector add-on is a commercial add-on that is licensed separately from any VitalPBX Licensing Plan. You will need to purchase a separate license to be able to declare more channels with MS Teams extensions. Without any licensing, you can declare 2 MS Teams extensions that can be called through VitalPBX.
Here are some recommendations before we start configuring the connection with Microsoft© Teams™.
- In this manual, we are going to create a Trial account to have access to MS Teams with Voice plan.
- We use the latest version available of VitalPBX.
- We must have a valid domain (FQDN) that we have access to configure at a DNS level.
- We must work from Windows™ since we are going to use PowerShell™ for some configurations and module installations. Although there are also versions of PowerShell™ for MacOS™.
When using your own SIP Trunk (BYOT) in combination with a VitalPBX to set up Direct Routing to Microsoft© Teams™ you will need to make some firewall rules.
Note: This applies to Microsoft 365, Office 365, and Office 365 GCC tenants.
When configuring Direct Routing you will need to setup 3 FQDNs for signaling.
- sip.pstnhub.microsoft.com
- sip2.pstnhub.microsoft.com
- sip3.pstnhub.microsoft.com
The first one will be located by location and performance metrics. If your location is EMEA, your 2nd location will be the US and the 3rd ASIA.
| Primary DC | sip.pstnhub.microsoft.com | EMEA | NOAM | ASIA |
| Secondary DC | sip2.pstnhub.microsoft.com | US | EU | US |
| Tertiary DC | sip3.pstnhub.microsoft.com | ASIA | ASIA | EU |
These FQDNs resolve to the following IP Address ranges.
- 52.112.0.0/14
- 52.120.0.0/14
In the list below you will find the extracted IP Address Ranges.
- 52.112.0.0/16
- 52.113.0.0/16
- 52.114.0.0/16
- 52.115.0.0/16
- 52.120.0.0/16
- 52.121.0.0/16
- 52.122.0.0/16
- 52.123.0.0/16
When we talk about media ports (not in media Bypass mode 2) the following ranges are used. Media is using a separate service in the Microsoft© cloud, these are called Media Processors.
Locations where both SIP proxy and media processor components are deployed.
- US (two in US West and US East data centers)
- Europe (Amsterdam and Dublin data centers)
- Asia (Singapore and Hong Kong data centers)
Locations where only media processors are deployed (SIP flows via the closest data center listed above).
- Japan (JP East and West data centers)
- Australia (AU East and Southeast data centers)
The following ranges are being used.
- 52.112.0.0/14
- 52.122.0.0/15
This information will help you configure your Firewall to prevent having these IP Addresses blocked. With all these recommendations, we can proceed to configure VitalPBX with MS Teams.
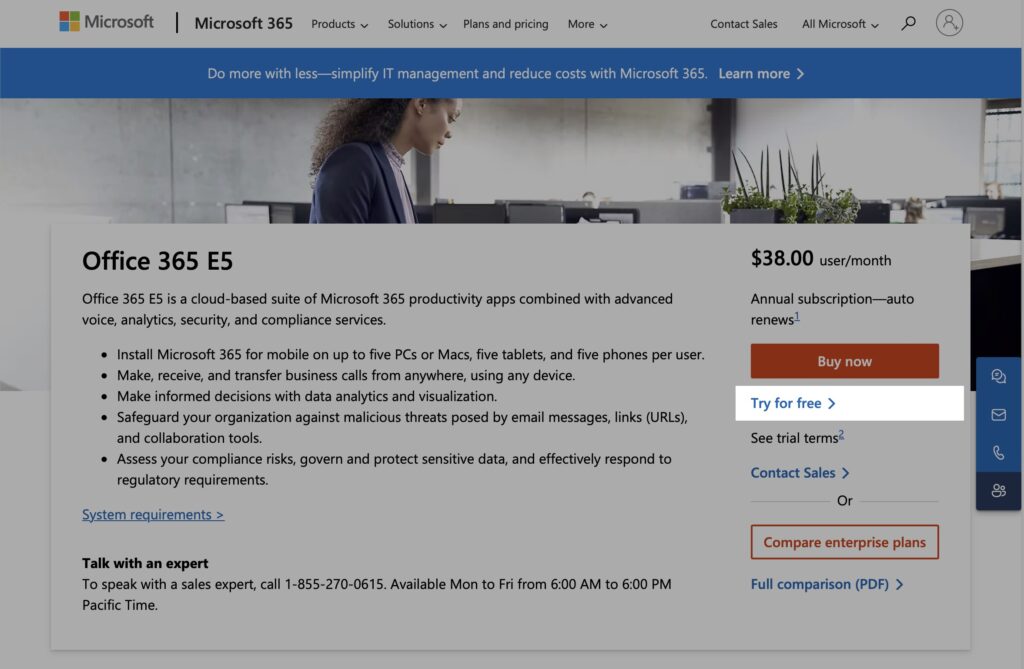
First, we go to the Microsoft© page and create an Office 365 E5 Trial account which already comes with MS Teams and the Phone System plan enabled. As Microsoft© constantly changes the links, we recommend going to microsoft.com and searching for the appropriate location for the Office 365™ plans.
Note: If in your country this type of plan is not available yet, and you want to choose the US. You must make sure that you have a cell phone number from the US so you can receive the codes they will send you by SMS.
It is also possible to use the Office 365™ E1 Plan or Microsoft 365™ Business Basic, but we would have to purchase the Phone System plugin separately.
During the account creation, we select the domain that contains mydomain.onmicrosoft.com. In this example, we will be using vitxi.onmicrosoft.com. Later, we will create a new domain that is the one that will be configured in our VitalPBX Server.
Once the account is created, we must take into consideration the following.
- Microsoft© 365 admin center – This is where we create users, domains, groups, etc.
- https://admin.microsoft.com/
- Microsoft© Teams™ administration – This is where we are going to configure the interconnection with VitalPBX.
- https://admin.teams.microsoft.com/
- Microsoft© Teams™ – This is where we will be able to make calls, conferences, chat, etc.
- https://teams.microsoft.com/
Now, we must go to the Microsoft© 365 admin center. Enter the username and password you used at the time of registration.
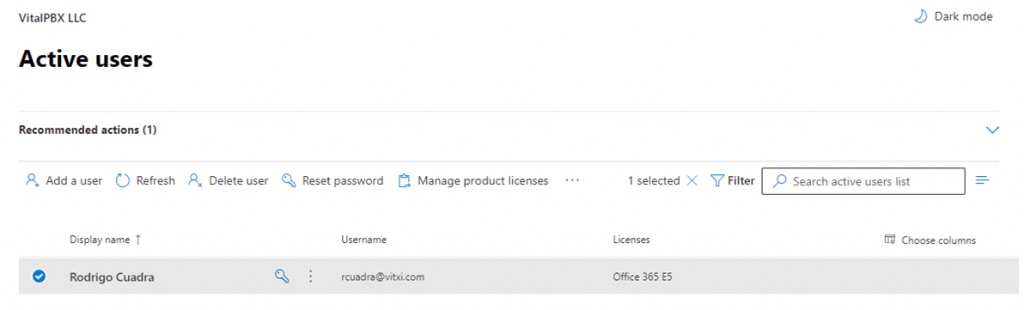
Go to User > Active Users. Here, you can manage the users you have created or create a new one. Here, we verify that our users have the appropriate licensing
Now, go to Settings > Domains on the left-hand side navigation menu. You might have to click on Show All to see the settings option. Here, you will see the domain that was created during the initial configuration of your account creation. We can also create a new domain from here.
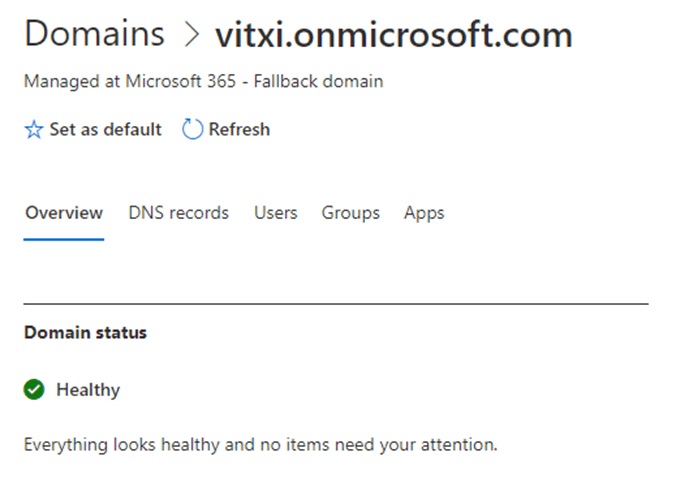
Next, we create a domain that matches the domain that we are going to connect our trunk to through Direct Routing of MS Teams. For this, click the + Add Domain button. This must be a domain that we have full control of, as we will be asked to make some changes to our DNS configurations, to prove our ownership of the domain. Once the domain is created, you will see it as follows.
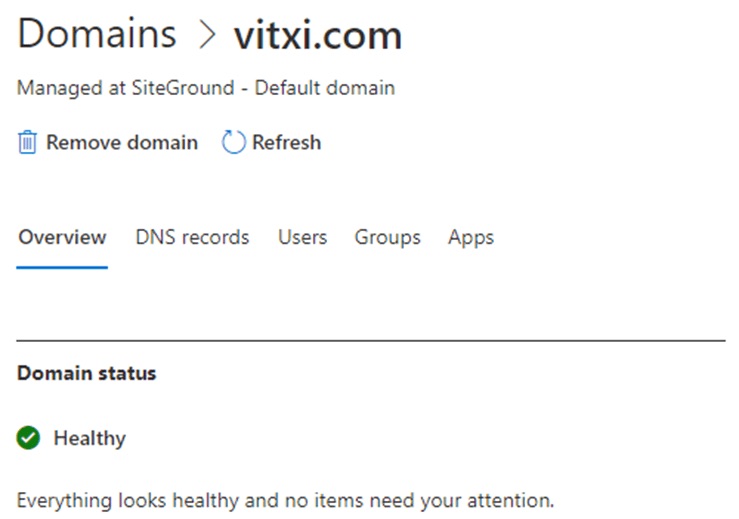
In this example, we are using vitxi.com. Take into consideration that our VitalPBX does not necessarily have to be in the domain itself, but it can be in a sub-domain of it, i.e.msteams.vitxi.com
Note: The domain on the user’s email must match the domain for the VitalPBX installation we are connecting with.
Afterward, we will need to connect to Microsoft© Teams™ using PowerShell™. Run PowerShell™ as an Administrator.
Then, run the following commands from PowerShell™.
PS C:\Windows\system32> Install-Module MicrosoftTeams
PS C:\Windows\system32> Import-Module MicrosoftTeams
Next, run the following commands which will prompt for the Office 365™ administrator credentials. Enter the user and password you created previously.
PS C:\Windows\system32> $credential = Get-Credential

cmdlet Get-Credential at command pipeline position 1
Supply values for the following parameters:
CredentialPS
C:\Windows\system32> Connect-MicrosoftTeams
Account Environment Tenant TenantId
-------------------------------------------------------------------------------
rcuadra@vitxi.onmicrosoft.com AzureCloud 5c199xxx-c629-4475-8fxx-a3edxxxxa92 5c199xxxc629-4475-8xxa-a3edxxxea92
PS C:\Windows\system32> Get-Command *onlinePSTNGateway*
CommandType Name Version Source
-------------------------------------------------------------------------------
Function Get-CsOnlinePSTNGateway 5.5.0 MicrosoftTeams
Function New-CsOnlinePSTNGateway 5.5.0 MicrosoftTeams
Function Remove-CsOnlinePSTNGateway 5.5.0 MicrosoftTeams
Function Set-CsOnlinePSTNGateway 5.5.0 MicrosoftTeams
This shows that the connection was successful and the commands are now available. Now, we will proceed to create the Direct Routing. We run the following command on PowerShell™ to do so. Remember to change the domain to the domain you have created previously.
PS C:\Windows\system32> New-CsOnlinePSTNGateway -Fqdn mydomain.com -SipSignalingPort 5061 -MaxConcurrentSessions 10 -Enabled $true

$trueIdentity                       : mydomain.com
InboundTeamsNumberTranslationRules  : {}
InboundPstnNumberTranslationRules   : {}
OutboundTeamsNumberTranslationRules : {}
OutboundPstnNumberTranslationRules  : {}
Fqdn                                : mydomain.com
SipSignalingPort                    : 5061
FailoverTimeSeconds                 : 10
ForwardCallHistory                  : False
ForwardPai                          : False
SendSipOptions                      : True
MaxConcurrentSessions               : 10
Enabled                             : True
MediaBypass                         : False
GatewaySiteId                       :
GatewaySiteLbrEnabled               : False
GatewayLbrEnabledUserOverride       : False
FailoverResponseCodes               : 408,503,504
PidfLoSupported                     : False
MediaRelayRoutingLocationOverride   :
ProxySbc                            :
BypassMode                          : None
Afterward, we create the Incoming Call Routing. To configure the routing of incoming calls within MS Teams, you must configure in MS Teams which phone number will be associated with it. To do this, execute the following commands on PowerShell™. Remember to change the user to the user you created previously.
PS C:\Windows\system32> Set-CsPhoneNumberAssignment -Identity myemail@mydomain.com -EnterpriseVoiceEnabled $true
PS C:\Windows\system32> Set-CsPhoneNumberAssignment -Identity myemail@mydomain.com -PhoneNumber “3000” -PhoneNumberType DirectRouting
With these commands, we have assigned the number 3000 to our user. This would be similar to assigning an extension number. This must be different from the numbering plan on your VitalPBX installation, so we can have easier routing when configuring our VitalPBX.
Now, we must configure the Outgoing Call Routing. For this run the following command on PowerShell™. Remember to change the domain to the domain you have added previously.
PS C:\Windows\system32> Set-CsOnlinePstnUsage -Identity Global -Usage @{Add=”Default”}
PS C:\Windows\system32> New-CsOnlineVoiceRoute -Identity “All” -NumberPattern “.*” -OnlinePstnGatewayList mydomain.com -Priority 0 -OnlinePstnUsages “Default”
Identity                : All
Priority                : 0
Description             :
NumberPattern           : .*
OnlinePstnUsages        : {Default}
OnlinePstnGatewayList   : {mydomain.com}
BridgeSourcePhoneNumber :
Name                    : All
Now, we will create an Auto-Attendant so we can later test our calling.
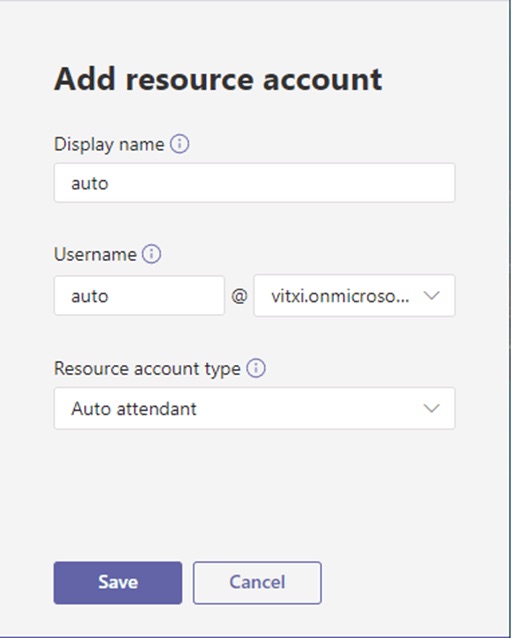
First, we will create a Resource account. Go to the Teams Admin Center, and go to Voice > Resource Accounts. We must create this account with our original domain using the onmicrosoft.com domain. Click on + Add, then add a Display Name to identify the resource, a Username, and set the Resource Account Type to Auto Attendant. Then click on Save.
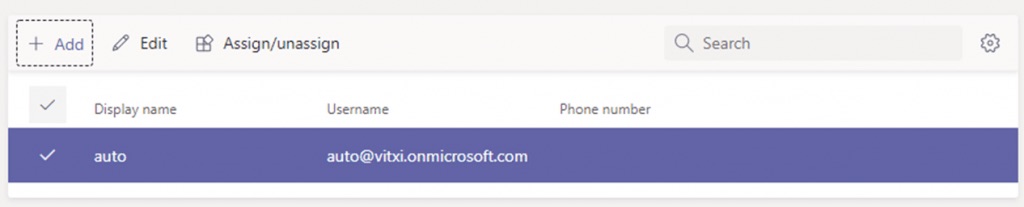
Once the resource is created it will look like this.
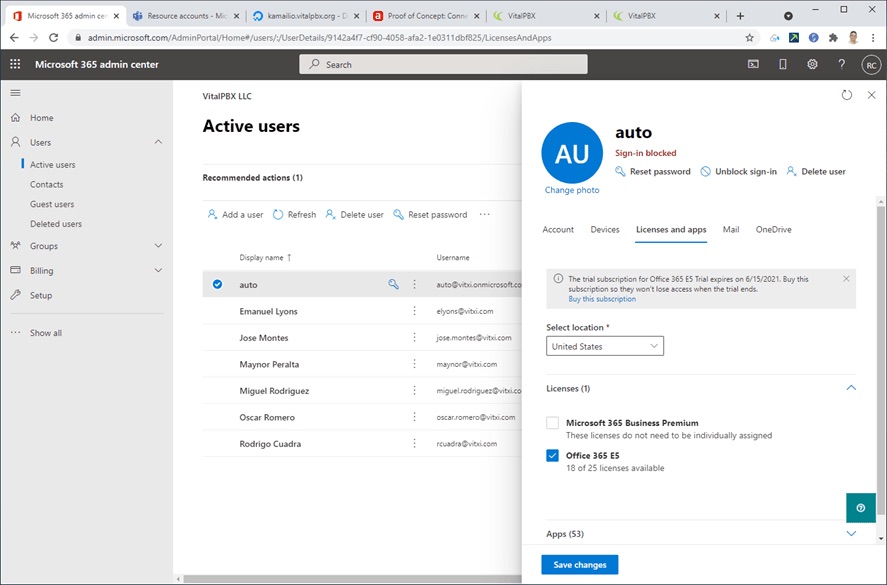
Now we go to the Microsoft© 365™ admin center and assign a license that contains Voice. For this, we go to Users > Active users, select the resource account user we just created, and edit it to assign the Office 365 E5 license.
Since we have created the new resource with the voice permissions, we must go to PowerShell™ and execute the following command, where +3100 is the number that we are going to dial to access the Auto Attendant.
Note: It may take up to 30 minutes for the new resource to recognize the license, so if you get a license error, wait for a moment.
PS C:\Windows\system32> Set-CsOnlineApplicationInstance -Identity “auto@vitxi.onmicrosoft.com” -OnpremPhoneNumber +3100
RunspaceId        : 738753bc-e7e9-4948-9d56-6a29b633920e
ObjectId          : 9142a4f7-cf90-4058-afa2-1e0311dbf825
TenantId          : 5c199f18-c629-4475-8f1a-a3ed1644ea92
UserPrincipalName : auto@mydomain.com
ApplicationId     : ce933385-9390-45d1-9512-c8d228074e07
DisplayName       : auto
PhoneNumber       :
Then, on the MS Teams admin center go to Voice > Auto Attendants, and follow the instructions. Verify that the extension was configured by entering the resource, which should look like this.

Now we are going to create our Auto Attendant, for which we go to the MS Teams admin center, then to Voice > Auto Attendants. Click on the + Add button.
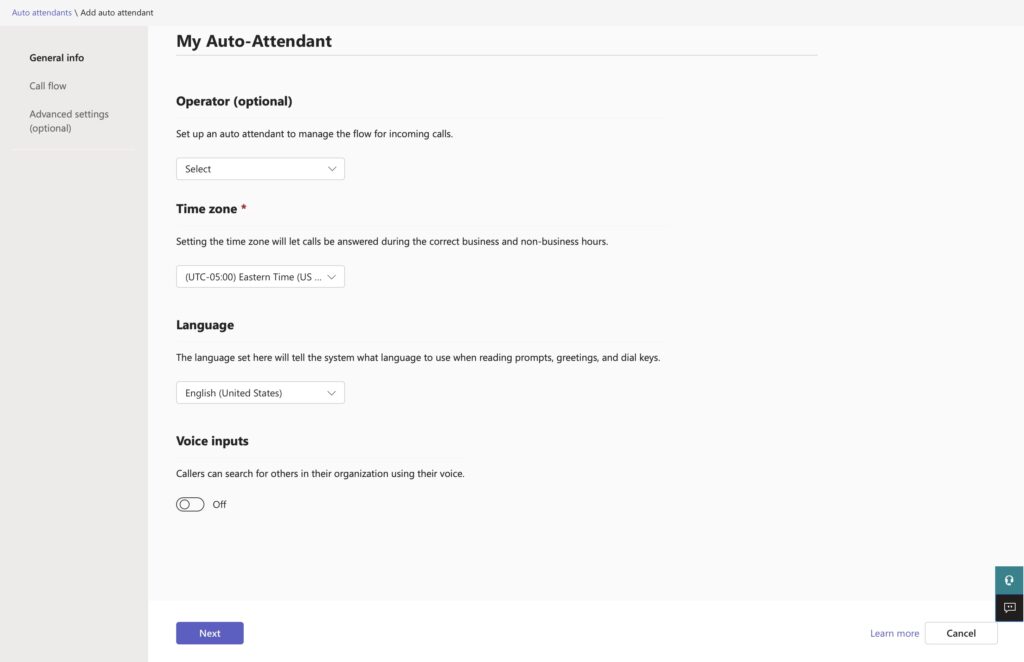
Under the General Info tab, give the auto-attendant a name to identify it. Then, leave the Operator option as is, set the time zone to your time zone, and select the language you are going to use. Click on Next.
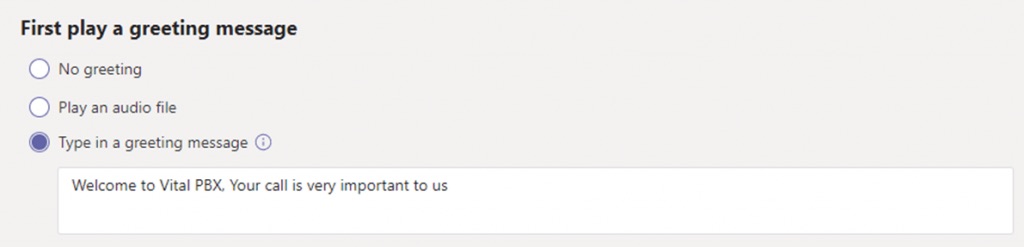
Under the Call Flow tab, for the First Play a Greeting Message option, you can type in a greeting message if you don’t have an audio file.
Next, under the Then Route The Call option, we will configure the dialing instructions so the caller can reach the desired destination.
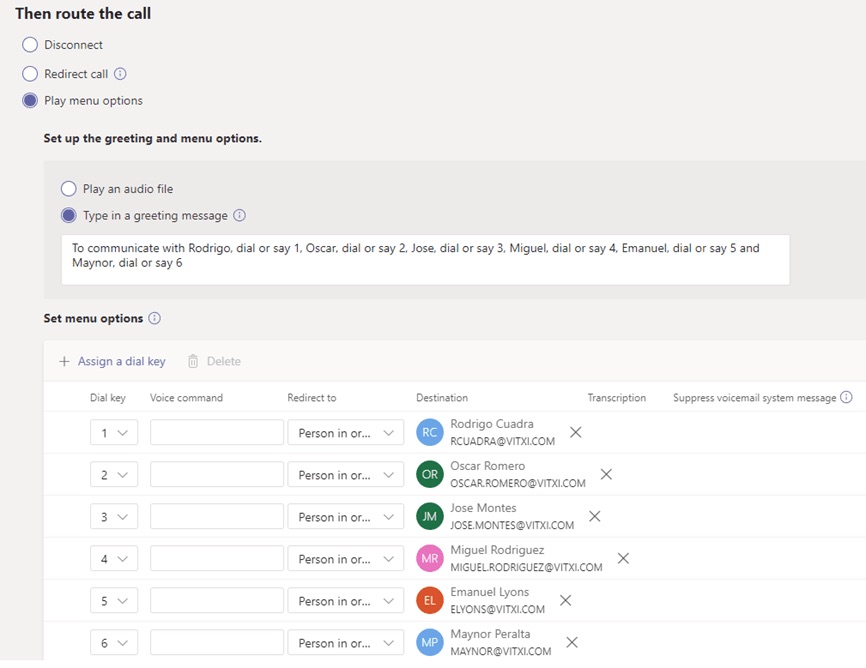
In our example, we have other users with the telephony plugin added to their accounts. If you only have one account, you will only be able to add that account as a menu option. Afterward, there is the option to add a schedule, but we will leave it as is.
With this, we now have an auto-attendant resource in Microsoft© Teams™ that we can dial
from any MS Teams user.
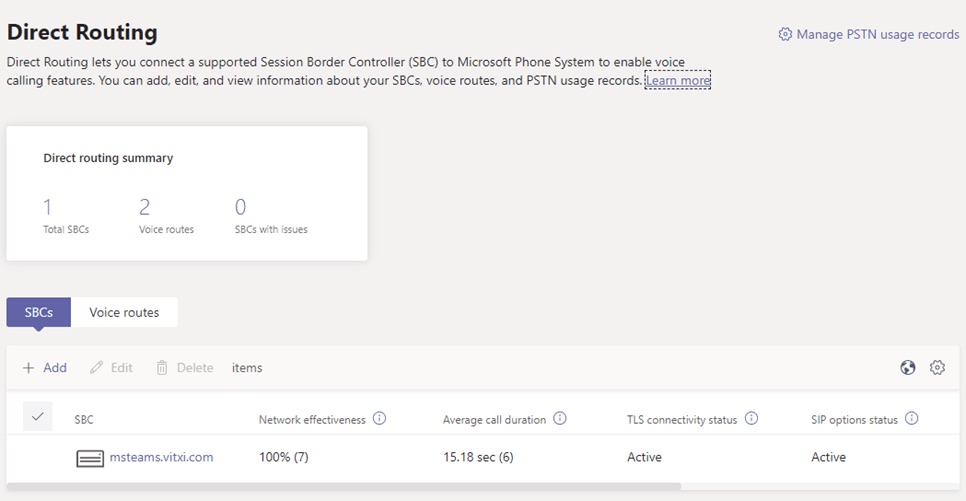
Now, we must verify the configurations in the Microsoft© Teams™ admin center. Go to Voice >
Direct Routing, and verify that the trunk towards our VitalPBX has been created. An error might appear at the beginning since we have not configured VitalPBX’s side, but after configuring VitalPBX, we will see the following screen.
Now, we can go ahead and configure VitalPBX for the MS Teams connection.
Before we proceed, remember that your VitalPBX installation must have a valid FQDN pointing to it using the same domain that you added to the Microsoft© admin center. This FQDN domain must have a valid SSL certificate, which can be created under Admin > System Settings > Certificates using Let’s Encrypt or a Custom Certificate. This will not work with self-signed certificates.
The certificate will then need to be assigned to the VitalPBX installation under Admin > System Settings > HTTP Server under the Certificate field, and Force HTTPS must be enabled.
Now, install the Microsoft© Teams™ Connector add-on under Admin > Add-Ons > Add-Ons. Once the add-on has been installed, refresh your browser and go to Settings > PBX Settings>Microsoft© Teams™
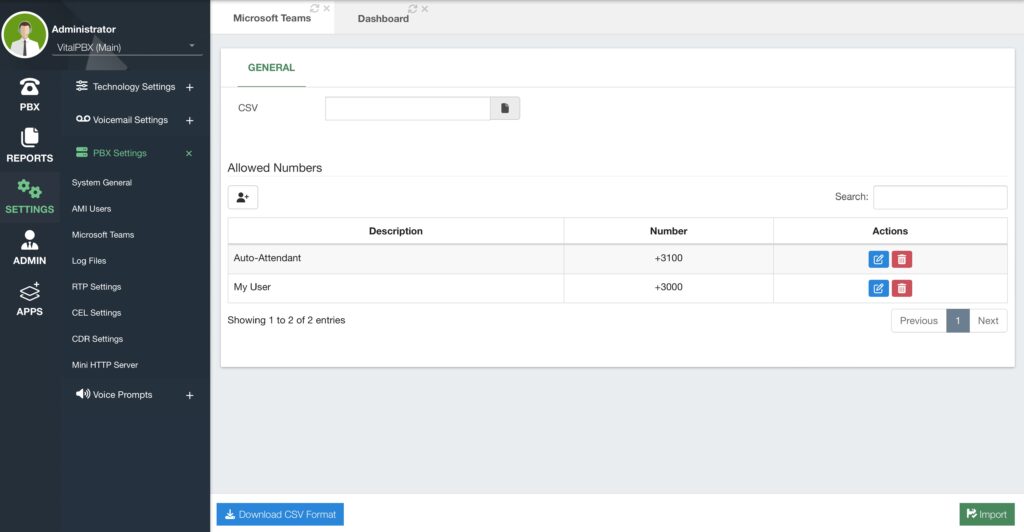
Here, you can declare the users and phone numbers we created in Microsoft© Teams™. This way, we can call them and receive their calls on VitalPBX. To add the users, you can click the Add button under Allowed Numbers.
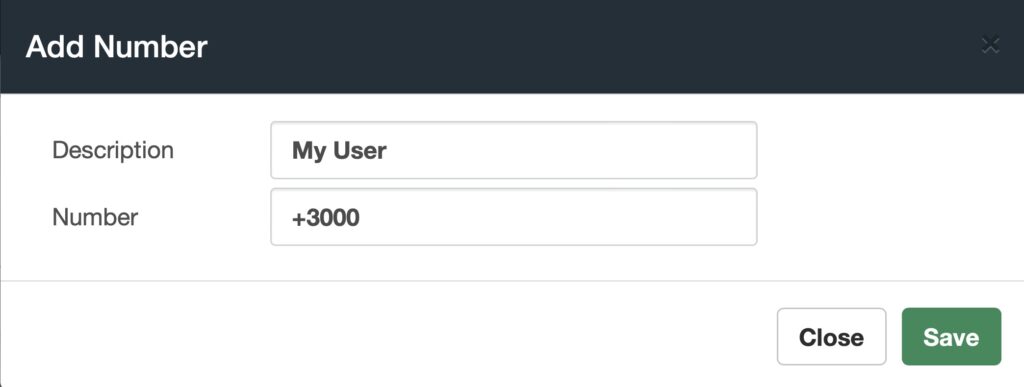
You can enter a description to identify the user and the number associated with this user. Remember to add the plus (+) sign at the beginning of the number. Then click on Save. If you have multiple users, you can import a CSV file with all the user data. A template is available under the Download CSV Format button in the lower left-hand corner. Once the file is added to the CSV field, you can click on Import in the lower right-hand corner. With the users created or imported, you can see them listed under Allowed Numbers, and edit or delete them.
The next step will be to configure the PJSIP settings. Go to Settings > Technology Settings > PJSIP Settings. You will now see a new field for MS Teams under NAT Settings, where you must declare the MS Teams Domain.
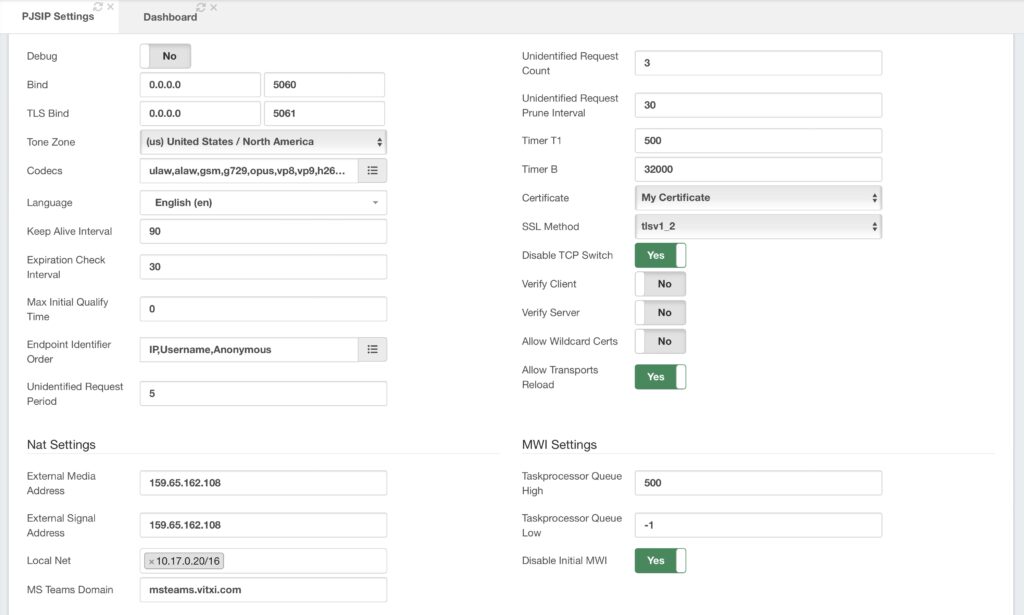
Additionally, we must set the Certificate we have created previously, set the SSL Method to tlsv1_2, add the External Media and Signal Addresses, and add the Local Net (optional, if available). Click on Save and then Apply Changes.
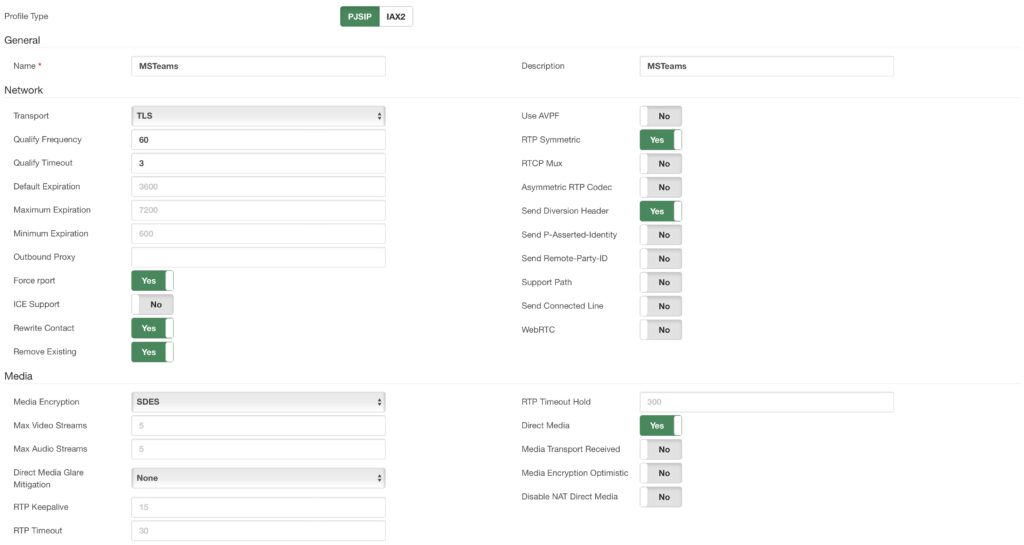
Now, we must create a new PJSIP Device Profile. Go to Settings > Technology Settings > Device Profiles.

Here, we select PJSIP as the technology. Then, set the Profile to the device profile we just created. Set the Codecs to ulaw, alaw, gsm, and the silk codecs. Under General Configurations, add any name without spaces to the Local Username. This will be used only to identify this trunk. Set the Transport to TLS + MS Teams. This transport is created when installing the MS Teams Connector add-on. For the Contacts enter sip:sip.pstnhub.microsoft.com, this is provided by Microsoft©. Under Match enter sip-all.pstnhub.microsoft.com, this is also provided by Microsoft©. Finally, under From Domain, enter the domain for your VitalPBX installation.
Then click on Save and then Apply Changes.
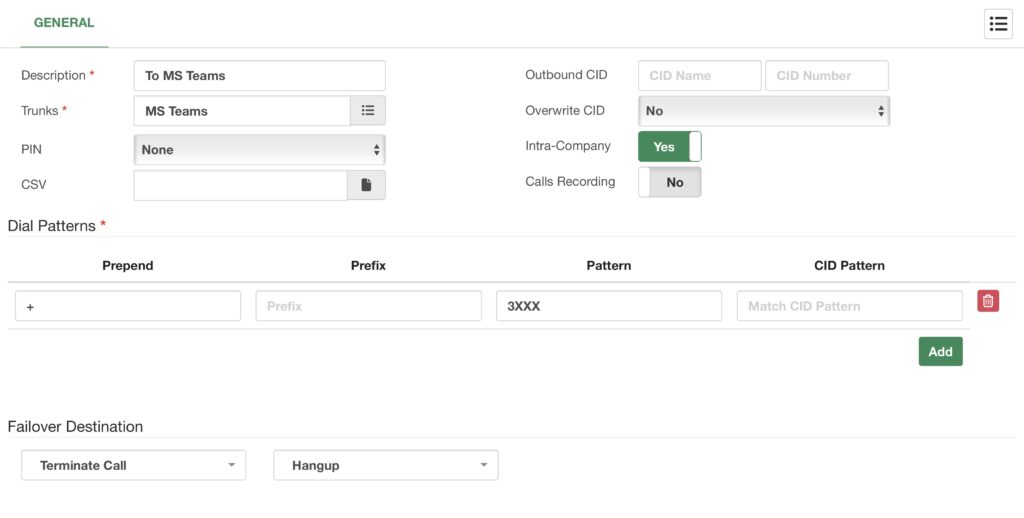
Next, we must configure our Outbound Routes. For this, go to PBX > Calls Routing > Outbound Routes.
Here, add a Description to identify the outbound route. Enable Intra-Company to use the internal CID information of extensions. Under Dial Patterns, we must Prepend a plus (+) sign to our Pattern since MS Teams only sends and receives calls with E.164 formatting. Since our MS Teams extensions start with a 3, we add the 3XXX pattern, but this may vary based on your configurations. Click on Save and then Apply Changes.
Now, we must configure our Inbound Routes. For this, go to PBX > Calls Routing > Inbound Routes.
For this, we will create an inbound route using a DID Range as the Routing Method. We then add a description to identify this inbound route. Under the DID Pattern we enter +20XX, as MS Teams will send the DID information with a plus (+) sign in front, and our extensions go from 2000 to 2099, in our example. This may vary based on your configurations. Under Range Parameters, we set the Digits to Take to 4, as we are interested in the number dialed without the plus sign. This will essentially, remove the plus sign to find the appropriate extension. We can leave the rest of the options as default. Click on Save and then Apply Changes.
With this, you can now try calling a Microsoft© Teams™ user from a VitalPBX extension or calling the Auto-Attendant we have configured.
You have now successfully connected Microsoft© Teams™ with your VitalPBX installation.


