Another way to integrate third-party applications is using the AMI or Asterisk Management Interface. This way, you can connect directly to the Asterisk layer VitalPBX uses and monitor and manage Asterisk directly. This is useful if you require real-time information to trigger events or monitor information on a third-party application.
You can see the full AMI documentation on the following link.
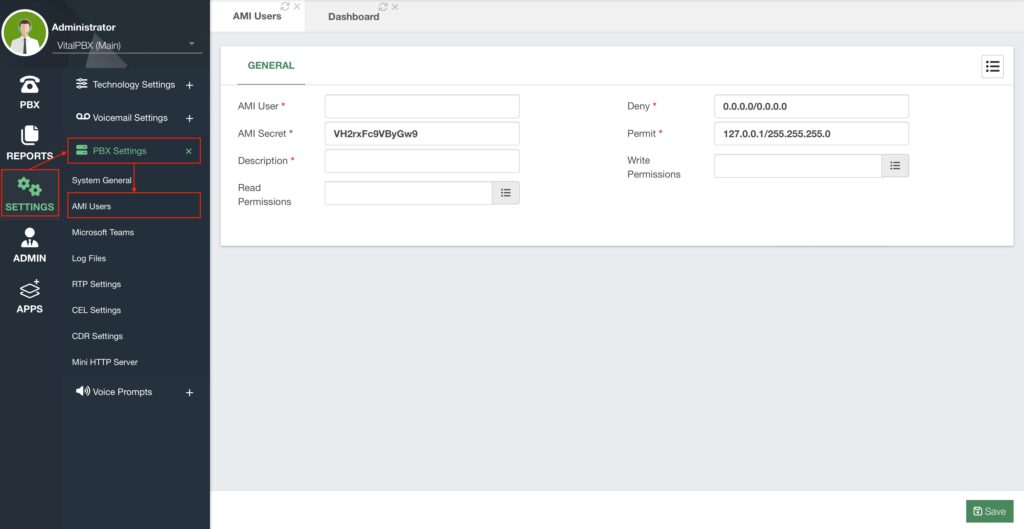
https://docs.asterisk.org/Configuration/Interfaces/Asterisk-Manager-Interface-AMI/ To create an AMI user in VitalPBX, go to Settings > PBX Settings > AMI Users. Here, you will create the AMI users that will connect directly with Asterisk.

You will need to define an AMI User and Secret. We generate a random password, and we recommend you use this randomly generated password for the best security. You will also need to enter a description to identify this user.
We also require you to use the Deny and Permit options for this user. With these fields, you specify the IP address or Network segment that can access Asterisk using this AMI user. It is important that you only allow the specific IP addresses that can connect to Asterisk using this AMI user as this is an extremely permissive user. An AMI user can affect your Asterisk directly, so we need to take all the precautions necessary.
You can also limit the read and write permissions, so the AMI users are only able to perform the tasks you need for your third-party application integration.
With everything set, you can Save and then Apply Changes.
With this, you are now able to connect directly with Asterisk and monitor and manage the Asterisk layer for VitalPBX from a third-party application.


