Now that you have the incoming calls dealt with, let’s move on to outgoing calls. For this, we can go to PBX > Calls Routing > Outbound Routes. Outbound Routes will allow you to place outgoing calls through a trunk.
To create your outbound route, you must add a Description to identify this outbound route. Next, we select a trunk. This can be the trunk we have created previously.
Afterward, we have the Dial Patterns. This is the heart of outbound routes. Outbound routes will identify the number you dial using these patterns, and route them through the trunk. There are three components for a dial pattern: Prepend, Prefix, Pattern, and CID Pattern.
Prepend adds the value entered to the beginning of the number you dial. So, if we add a 1 here, for example, whenever you dial a number that matches this pattern, 1 is added automatically at the beginning.
Prefix, is a number that is removed from the beginning of the number you dial. Say you want to use the number 9 to always use this specific outbound route. You establish 9 as a prefix, and dial the number with the 9 at the beginning, i.e. 913055605776. The 9 is removed and you will be sending 13055605776, which is accepted by the PBX or VoIP system the trunk is connected to.
The Pattern is the base for the Dial Patterns. With this, you establish the numbers that can be dialed. Patterns become powerful with the available variables. This way, you don’t have to configure every existing number possibility.
Here is an explanation of the available patterns and some examples of how they work.
- X – This is any number between 0 and 9.
- Z – This is any number between 1 and 9.
- N – This is any number between 2 and 9.
- . – The dot is a Wild Card that matches 1 or more digits immediately. This means that
from the dot onward, you can have as many digits as you need. - ! – The exclamation mark or bang is a Wild Card that matches 0 or more digits
immediately. This means that from the bang onward, you can have no more digits or
as many as you need. - [1,2,3-9 ] – Whenever you encapsulate digits in square brackets, you establish the
numbers that can be used in this character space. You can establish individual digits
separated by a comma or a range of digits separated by a dash (-). - [a-z] – Matches the characters in lowercase. Remember, in telephony, letters are also
valid destinations to dial. - [A-Z] – Matches the characters in uppercase. Again, in telephony, letters are also valid
destinations to dial.
With these variables, let’s say we want to match all numbers that are valid in the USA. For this, we can type down the following pattern.
NXXNXXXXXXThis pattern can be interpreted as follows. The area code (first three digits), NXX, means that the first digit can be any number from 1 to 9, and the second and third digits are any number from 0 to 9. Then, the telephone prefix (middle three digits) acts the same way with NXX. Finally, the Line Number, XXXX, makes the last four digits any number from 0000 to 9999.
This way, you now support all valid US numbers, with a single dial pattern. Now, sometimes, you need to add the country code at the beginning and the end-user might dial it or not. For this, you can support this by adding the 1 at the beginning of the pattern, i.e. 1NXXNXXXXXX. As well as adding the 1 on the prepend field so it is added automatically to the pattern without the 1 at the beginning.
Next, let’s tackle international numbers. International numbers may vary in length. So here, wild cards are of great use. We can create the following pattern to support international dialing from the USA.
011. In the USA we use 011 followed by the international number, including the country code, to dial internationally. So, we can use the dot wild card to support any phone number of any length. Whenever an end-user dials 011+International Number, no matter how long the international number is, the call will be routed correctly.
In the end, the Outbound Route will look like the following image.
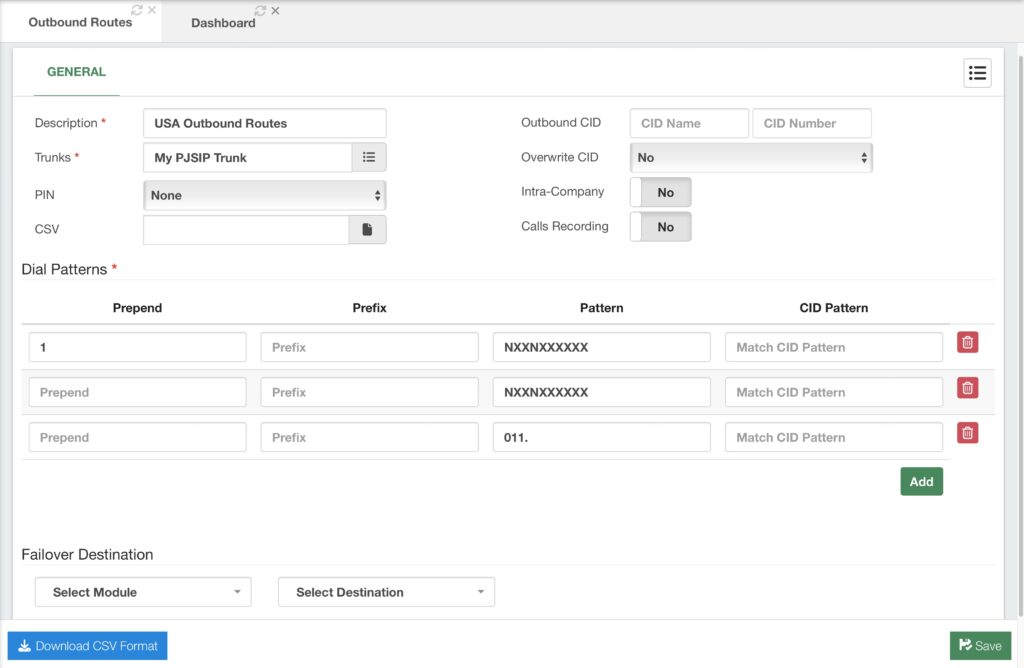
These three specific patterns will allow users in the USA to dial Locally and Long Distance, as well as Internationally. Number patterns will vary depending on your country or where you are routing the calls, so hopefully these examples help you understand how patterns work so you can create Dial Patterns that match your numbering patterns. Remember to Save and Apply Changes.
If you have multiple patterns you can import a CSV file with the patterns. The CSV Format can be downloaded from the Download CSV Format button in the lower left-hand corner. Additionally, you can set a CID Name and Number and Overwrite the Caller ID at the outbound route level. This way, anytime a call goes through this outbound route, the CID is modified. If you enable the Intra-Company option, your extension’s Internal Caller ID is used instead of the External Caller ID. This is useful if the connection is with another PBX system, where you would like to show the Extension Number instead of a long number. Finally, you can enable Call Recording at the outbound route level. Just remember that if you enable call recording in multiple stages of a call, duplicate recordings will be created.


