Now that you have a trunk created we need to be able to place incoming and outgoing calls through it, these are called routes. First, let’s deal with incoming calls using Inbound Routes.
For this, we need to go to PBX > Calls Routing > Inbound Routes.
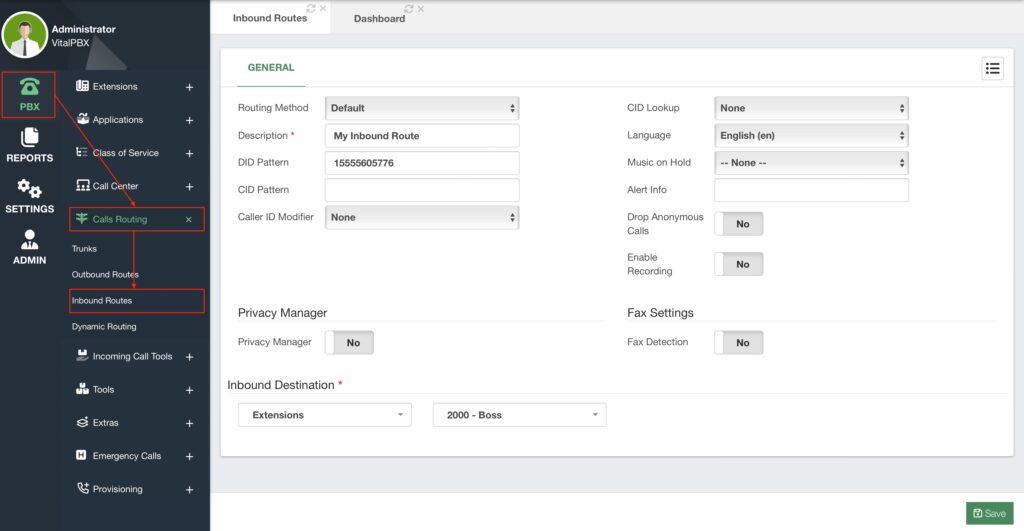
The first thing we need to do is choose our Routing Method. There are two types of routing methods, Default and DID Range. Let’s begin with the default routing method. Next, we need to add a Description to identify this inbound route.
The default routing method identifies the DID or phone number the calling party is dialing and routes it to a destination.
You can enter a specific DID Pattern so whenever someone dials that pattern calls get routed. Adding a CID (Caller ID) Pattern will make it so only when someone with this specific Caller ID calls this DID pattern, will get routed with this inbound route. If you leave both the DID and CID pattern fields empty, this means that anyone calling any DID pattern with any CID pattern will get routed by this inbound route. This is what we usually call an Any/Any route.
The last thing we need to configure an inbound route is the Inbound Destination. This is an extension or module that can take an incoming call in VitalPBX. This can be an IVR, a Queue, a Ring Group, etc. For the example, I set it to the Boss Extension, but you can use anything of your choosing.
You can now Save and Apply Changes. If you followed the Extension creation section for this guide, you might remember that we assigned an Incoming Route to the Boss extension. You can find the list of all incoming routes in the list located in the upper right-hand corner.
We have more tools that you can use for incoming calls. We will see more of them later, but for
now, these are other configurations you can have with inbound routes.
- Language – Voice prompt language will be changed when calling through this
inbound route. - Music on Hold – You can set the MOH that plays back when calling through this
inbound route. - Alert Info – This is a header that will be added to calls going through this inbound
route. The Alert-Info header can be used for custom ringtones with endpoint devices. - Drop Anonymous Calls – Any call without a caller ID is identified as Anonymous.
With this option, you can drop any call that comes without a CID. - Enable Recording – This will enable call recording of calls going through this inbound
route. Again, remember if you enable call recording in multiple stages of an incoming
call, duplicates of that call recording will be generated. - Privacy Manager – This feature will prompt the calling party to enter their caller ID
information if they don’t have one. - Fax Detection – This will detect if the incoming call is a fax message. With this
enabled, you can change the Detection Time in seconds and set a Fax Destination.
Keep in mind this will add a delay to incoming calls as it will need to detect the Fax
tones
So now, you will have an inbound route. If you connected your VitalPBX installation using a trunk with your VoIP Provider, you can try calling any number associated with that trunk to test the incoming call.
If everything matches, the call will now be redirected to the Inbound Destination.
Optionally, you can also create an inbound route with the DID Range routing method. What this method allows you to do, is to have multiple routes with a range of DIDs.
Let’s say, you have a range of DIDs that goes from 13055601000-13055601100. You want to associate the last three digits of the DIDs with extensions you have created. So, what we can do in this case is change the routing method from Default to DID Range. And for the DID Pattern, we can enter 13055601XXX. The Xs in this case means any number between 0 and 9.
We will see more about how variables work in patterns in the Outbound Routes lesson.
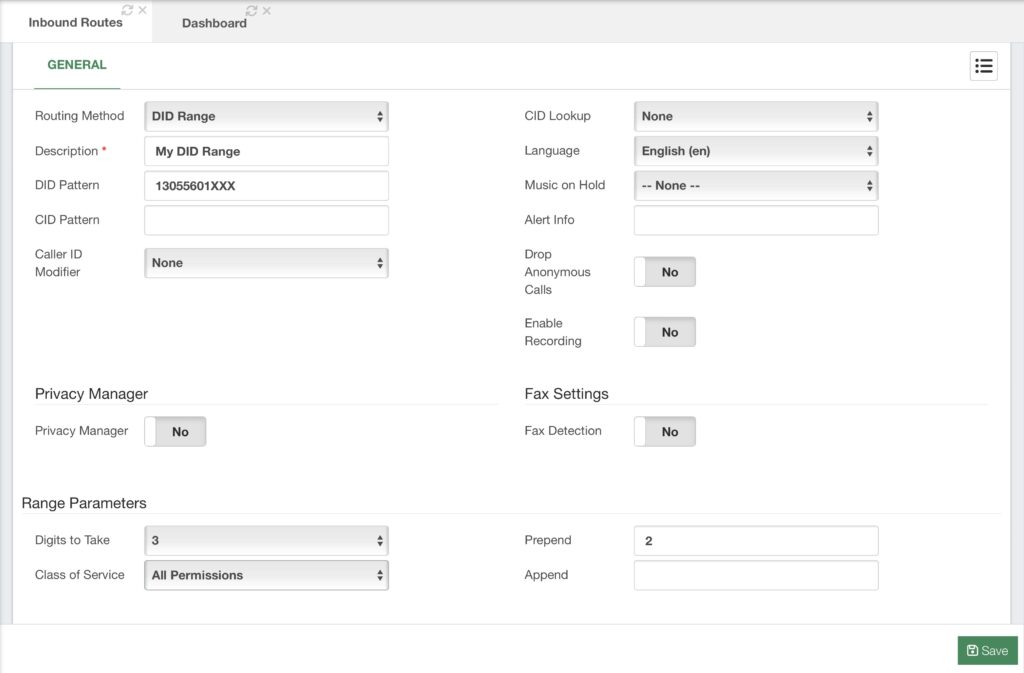
You will notice that instead of a single destination, we now have the Range Parameters. Here we will establish the Digits to Take. So for our example, we will take the last 3 digits from our range. Then we have Prepend and Append. Prepend will add digits before the digits we took, and Append will add them after. Let’s say our extensions go from 2000 to 2100. Since we took the last three digits from our range which goes from 000 to 100, we can prepend a 2, so the numbering matches with our extensions.
For Class of Service, we can leave the default All Permissions CoS. We will see more about Class of Service later.
With these configurations, whenever someone calls any DID from our Range, calls will be routed to the matching extension. This way, we don’t need to create an incoming route for every extension. Remember to Save and Apply Changes.


