Businesses will tend to incoming calls within certain hours, or some will do a 24×7 service. Depending on the time of the day, you might tend to incoming calls in different ways. Or even on holidays, you might divert calls to another destination. With VitalPBX this is very easy using Time Groups and Time Conditions. This allows us to have incoming calls based on a schedule.
We have seen Time Groups in previous sections with the Least Cost Routing configurations, but in this section, we will add more details to the Time Groups.
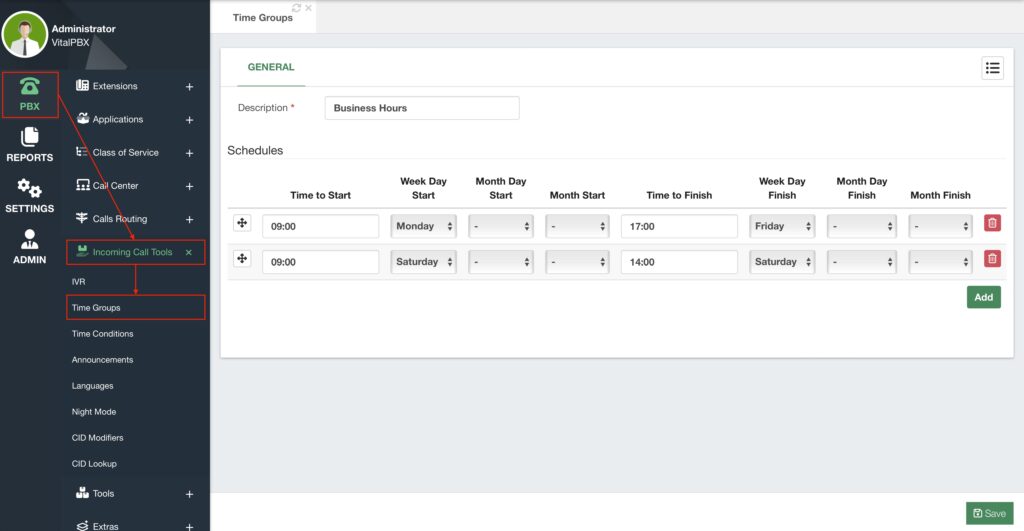
So, to begin our configurations we must go to PBX > Incoming Call Tools > Time Groups. For this guide, we will do an example of setting business hours for our Incoming Calls Routing.
First, let’s add a Description to identify this time group. Next, we will add our schedules. In this example, we will define the Business hours as follows.
- Monday – Friday, from 09:00 to 17:00
- Saturday, from 09:00 to 14:00
- Sundays, closed
To configure this, we will need two defined schedules. The first one will have the Time to Start at 09:00, Week Day Start as Monday, Time to Finish at 17:00, and Week Day Finish as Friday. Next, click the green Add button, and set the Time to Start at 09:00, Week Day Start as Saturday, Time to Finish at 14:00, and Week Day Finish as Saturday.

With these settings, whenever the system clock is within the defined schedules, the time group will return TRUE, matching our business hours.
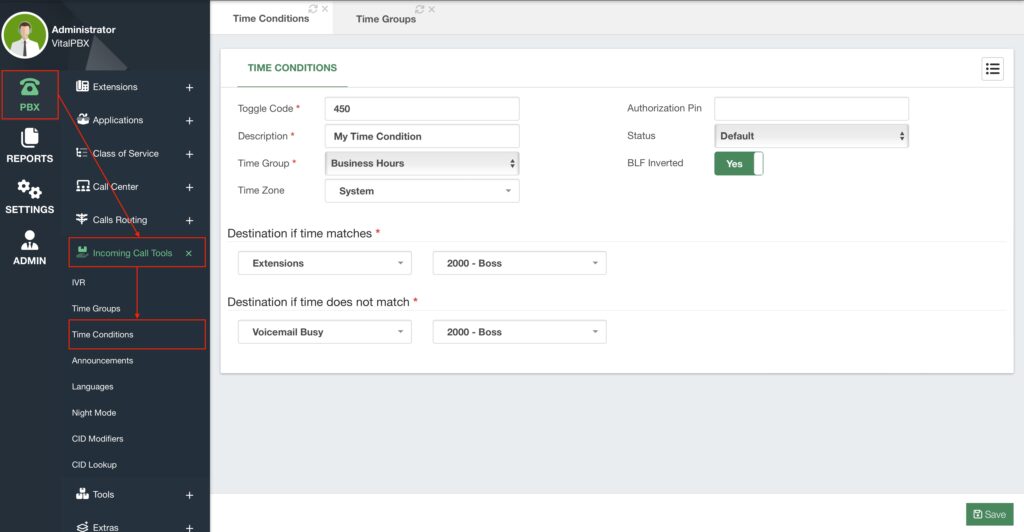
Now that we have a Time Group with our Business Hours, we can apply them to a Time Condition. For this, we go to PBX > Incoming Calls Tools > Time Condition.
Time conditions allow us to choose a destination based on a time group. First, we will define a Toggle Code, which will allow us to manually toggle the current status of the time condition. Next, we set a Description to identify the time condition, and we select the Time Group we have created.

Afterward, we have an extended feature only available with the Starter License or any of our Licensing Plans. This is the Time Zone option. This allows you to define a time zone specific to this time condition.
Then, you can enter an Authorization PIN for security purposes, so you need to enter this PIN when changing the status manually using the toggle code. You can also change the Status from here as well. You can choose one of the following options.
- Temporary Matched – The time condition will redirect calls to the If Time Matches
Destination temporarily, until the next time the Time Group does not match. - Temporary Unmatched – The time condition will redirect calls to the If Time Does Not
Match Destination temporarily, until the next time the Time Group matches. - Permanently Matched – The time condition will redirect calls to the If Time Matches
Destination temporarily until this is changed directly. - Permanently Unmatched – The time condition will redirect calls to the If Time Does
Not Match Destination temporarily until this is changed directly
Afterward, you can enable or disable the BLF Inverted. By default, when monitoring Time Conditions with a BLF key, the light is green when the time matches and red when the time does not match.
Finally, we have the Destination if the time matches and does not match. This is the principle of how time conditions work. When the Status is set to Default, the time condition will be based on the time group. When the system time matches the time group you will be taken to a destination, and when it doesn’t you are taken to the other destination. You can choose the destination of your liking for these options.
With this configured, you can now Save and Apply Changes.
Now, you have a time condition created with a time group. You can add this time condition to an IVR or Inbound Route, for example. This way, whenever someone calls into your VitalPBX, they will taken to the time condition and if the time matches they are taken to destination A, and if it doesn’t match, they are taken to Destination B.


