There are various default configurations you can set for your VitalPBX. These are general system configurations. To set these you must go to Settings > PBX Settings > System General.
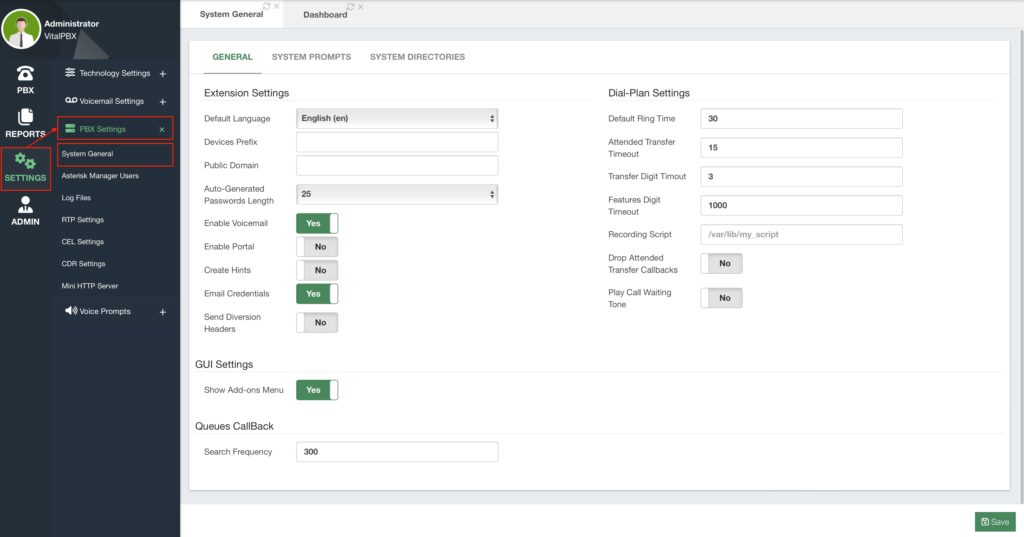
First, we have the General tab. Here we find the default Extension, Dial Plan, GUI, and Queues Callback Settings.
For Extensions, we can set the following default settings.
- Default Language – This is the voice prompt language used for new extensions.
- Devices Prefix – This is a prefix automatically added to device users.
- Public Domain – This is the FQDN (Fully Qualified Domain Name) used for various
URL settings. This will overwrite the hostname set for this installation. - Auto-Generated Passwords Length – This is the default length for auto-generated
passwords. - Enable Voicemail – This is whether or not voicemail is enabled by default for
extensions. - Enable Portal – This is whether or not the User Portal is enabled by default.
- Create Hints – This is whether or not Hints are generated for new extensions. Keep in
mind that enabling hints for all extensions can take a toll on system performance. - Email Credentials – If enabled, this will send the extension welcome email to new
extensions. - Send Diversion Headers – If enabled, additional call diversion headers will be sent
such as the different Call Forwards. Some SBCs might complain if these are enabled.
For the Dial Plan Settings, we can establish the following default settings.
- Default Ring Time – This is the default time in seconds an extension will ring before
going to voicemail or hangup. - Attended Transfer Timeout – This is the default time in seconds where a call is
placed after the last digit is dialed for an attended transfer. - Transfer Digit Timeout – This is the default time in seconds between digits pressed
during a call transfer. - Features Digit Timeout – This is the default time in milliseconds between digits for a
feature during a call. - Recording Script – This is a custom script that can be run after a call is recorded.
- Drop Attended Transfer Callbacks – When set to No, Asterisk will call the transfer
initiator back after an early hangup if the transferred party does not answer the
attended transfer. - Play Call Waiting Tone – When set to Yes a tone will play when an extension receives
a new call while on an existing call.
Finally, we have the Show Add-Ons Menu for the GUI Settings, which will hide direct access to the Sonata Suite and VitXi from the login screen if it is set to No. And if you have the Queues Callback module installed, you are able to set the Search Frequency which is how often the Queues Callback will search for queued calls for a callback.
If you make any changes in this module, you can then Save and Apply Changes.
Next, we have the System Prompts tab. Here, you can change the voice prompts used when you have Do Not Disturb turned on, and the prompt that plays back when a blacklisted number calls your VitalPBX and you didn’t set a destination for blacklisted calls.
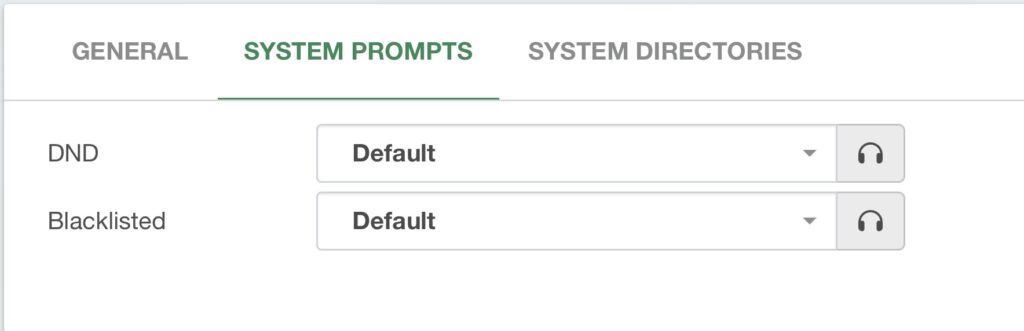
Once you select the sound recordings for these voice prompts, you can Save and Apply Changes.
Lastly, we have the System Directories tab, which will show you the directories for popular Asterisk locations.
- Asterisk AGI Directory – /var/lib/asterisk/agi-bin
- Asterisk Directory – /etc/asterisk
- Asterisk Log Directory – /var/log/asterisk
- Asterisk Modules Directory – /usr/lib/asterisk/modules
- Asterisk Sound Directory – /var/lib/asterisk/sounds
- Asterisk Spool Directory – /var/spool/asterisk
- Asterisk Libraries Directory – /var/lib/asterisk


