One of the most essential features in a PBX system is the automated attendant or IVR (Interactive Voice Response). With VitalPBX you can easily configure multiple IVRs that will help you reach any destination of your choosing. To configure an IVR, you must go to PBX > Incoming Call Tools > IVR.
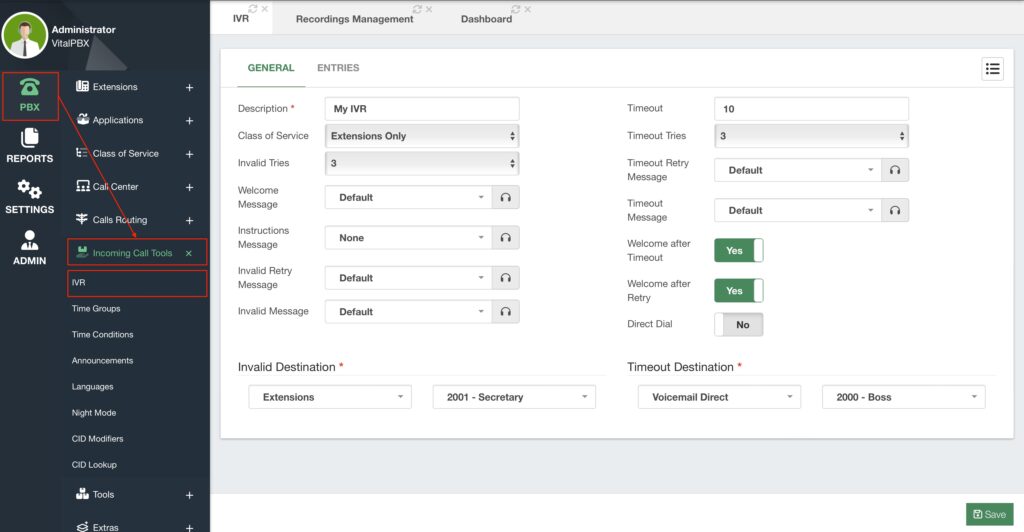
There are two tabs in the IVR module, the General and the Entries tabs. In the General tab, as the name implies, we will do general configurations for how the IVR menu will operate. First, we will add a Description to identify this IVR menu. Next, we will define the number of Invalid Tries. This is how many times a caller can input invalid responses before being transferred to the Invalid Destination, which can be any destination of your liking. To the right of this, we have the Timeout time and the Timeout Tries. This is the time you will give the caller to input anything, and the tries are the number of times the caller can timeout.
Next, we have a set of messages that will playback to the caller. The Welcome and the Instructions Messages will playback to the caller when they reach this IVR.
The welcome and instructions messages are separate, as you can playback just the instructions message after the Timeout and Invalid Retries. The welcome message is only played back after these retries if you have the Welcome After Timeout and Welcome After Retry enabled. The Invalid Retry and Timeout Retry Messages are played back after every Invalid and Timeout retry. The Invalid and Timeout Messages are played back right before the call goes to the Invalid or Timeout Destinations. These messages are sound files that you have uploaded using our Recordings Management module, as we saw in a previous lesson.
Finally, you have the Direct Dial feature. When enabled, this will allow callers to dial numbers directly from the IVR. If this is enabled, we have a default Class of Service called Extensions Only pre-selected. This is for security purposes, as you need to be careful about the numbers callers can dial from the IVR. If you have a permissive Class of Service, callers might be able to dial valid outbound numbers and this can lead to abuse of your trunks. So, if you require callers to Direct Dial anything else than your local extensions directly, make sure you create an appropriate Class of Service so they only dial what you expect them to dial.
Now, let’s move over to the Entries tab. This is the basis for the IVR to operate. Here, you define the digits the caller will be able to press and take them to their selected destination. First, you will enter the Digit the caller can enter, then select the Module/Destination this will take them, and finally, you can Enable or Disable this option, as well as Delete it. You can add multiple digits, by clicking the green Add button.
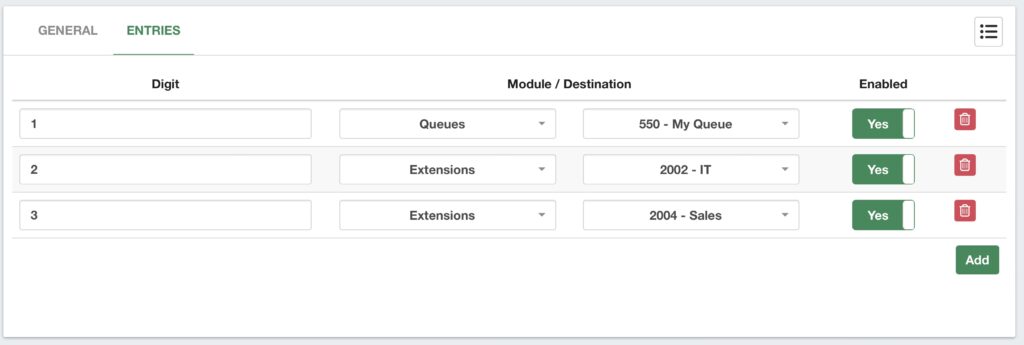
With this, you can now click on Save in the lower right-hand corner, and Apply Change.
Note: It is true that we can create as many entry options as we want with the IVR
module in VitalPBX. As a general recommendation and rule of thumb, we don’t
recommend adding more than 4 entries at a time for an IVR menu. This is for
general customer satisfaction and operation. Customers will start to forget the
options they are given after hearing more than 4 entries and might need to listen
to the instructions message again. If you truly require more than 4 options, the
best solution is to create sub-menus. This means that an IVR entry option will
take you to another IVR menu with the rest of the options.
Now that you have an IVR menu created, you can use this as a destination for your inbound routes. So whenever a customer calls your business, they will be presented with an elegant menu and options to direct them to their desired destination.


