Now, let’s explore how you can make customizations to the Asterisk dial plan, and set them as destinations in VitalPBX with the Custom Contexts add-on module. This is a free add-on module you can use to declare a custom Asterisk Context you create as a destination within VitalPBX.
With a custom context, you have the freedom to integrate any external service with VitalPBX at a deep level. Custom Contexts will allow you to interface between the Asterisk dial plan, VitalPBX, and any external service or application. You are expected to have Asterisk knowledge to use this feature within VitalPBX. Throughout this lesson, we will be showing one example of using Custom Contexts, but your imagination and Asterisk knowledge are your only limits.
Before using the Custom Contexts add-on, we need to have a context created. In this example, will be creating a service to playback the public IP Address of our server to callers that dial a special code. For this, we will be using the services of ipinfo.io and the CURL application for Asterisk.
Now, log in via SSH to your VitalPBX server, ideally as the root user. Use the following command to go to where the .conf files are located in VitalPBX.
root@debian:~# cd /etc/asterisk/vitalpbxYou will notice that all of the .conf files here have a number. This is used to maintain a sequence order of how the files are read. You can create a new .conf file using the following structure: extensions__{ANYNUMBER}-{DESCRIPTION}.conf, where {ANYNUMBER} is a consecutive number that represents the order that Asterisk will read the files, and the {DESCRIPTION} is any string used to identify what the file contains. So for our example, we will run the following command to create a new .conf file for our custom context using nano.
root@debian:/etc/asterisk/vitalpbx# nano extensions__90-custom.confWith this, we make sure that our custom context is considered after the extensions’s contexts.
Inside the extensions__90-custom.conf file, we add the following content as our context.
[say-public-ip]
exten => s,1,NoOp(Say Public IP Address)
 same => n,Answer()
 same => n,Set(PUBLIC_IP=${CURL(http://ipinfo.io/ip)})
 same => n,Playback(your-public-ip-is)
 same => n,SayDigits(${CUT(PUBLIC_IP,.,1)})
 same => n,Playback(letters/dot)
 same => n,SayDigits(${CUT(PUBLIC_IP,.,2)})
 same => n,Playback(letters/dot)
 same => n,SayDigits(${CUT(PUBLIC_IP,.,3)})
 same => n,Playback(letters/dot)
 same => n,SayDigits(${CUT(PUBLIC_IP,.,4)})
 same => n,PlayBack(silence/1&vm-goodbye)
 same => n,Hangup()
Then we Save and Exit nano. Then, we reload the Asterisk Dial Plan using the following command.
root@debian:/etc/asterisk/vitalpbx# asterisk -rx "dialplan reload"Note: When creating the new .conf file, notice that there are 2 underscores(_) after extensions. So it is extensions__90-custom.conf, not extensions_90-custom.conf.
You may notice the your-public-ip-is sound file that does not come with VitalPBX by default. This sound can be downloaded and added to your system using the following command.
root@debian:~# wget -P /var/lib/asterisk/sounds/en/ https://github.com/VitalPBX/custom-contexts/raw/master/sounds/your-public-ip-is.wavWith the context created, you must install the add-on from Admin > Add-Ons > Add-Ons. Once the add-on has been installed, refresh your browser, and go to PBX > Applications >Once the add-on has been installed, refresh your browser, and go to PBX > Applications > Custom Contexts.
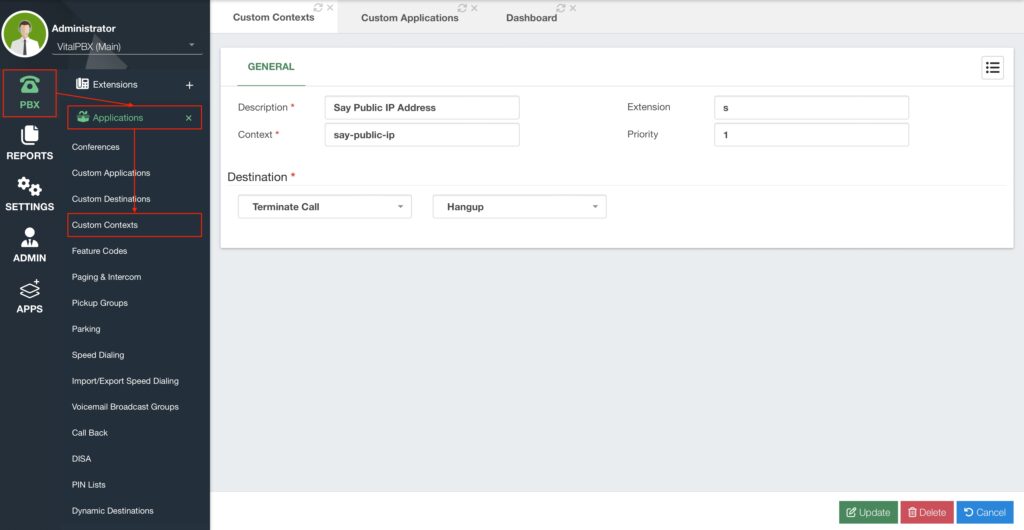
Here, you must add a Description to identify this context. Then under Context, enter the name of the context without the square brackets. Optionally, you can specify the Extension and Priority of the context. Under Destination, you can set a destination where you will take the user after they reach the custom context. Click on Save and then Apply Changes.
To test the custom context, we will create a custom application so we can have a code to dial the custom context. Go to PBX > Applications > Custom Applications.
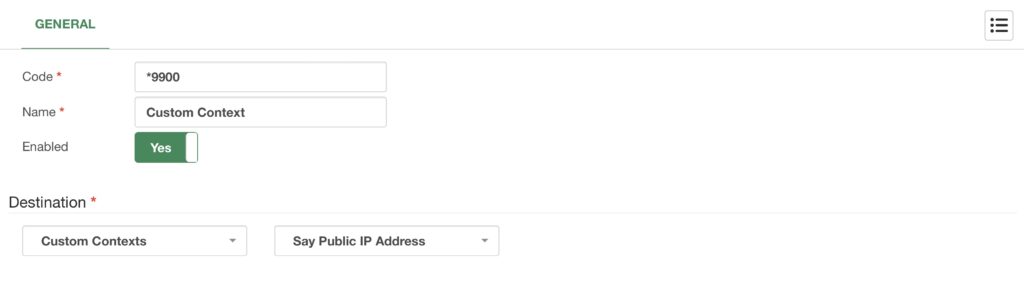
Add a Code to dial, set a Name to identify this custom application, and add the custom context as the destination. Then, Save and then Apply Changes. Now when you dial this code, you will go to your custom context.


