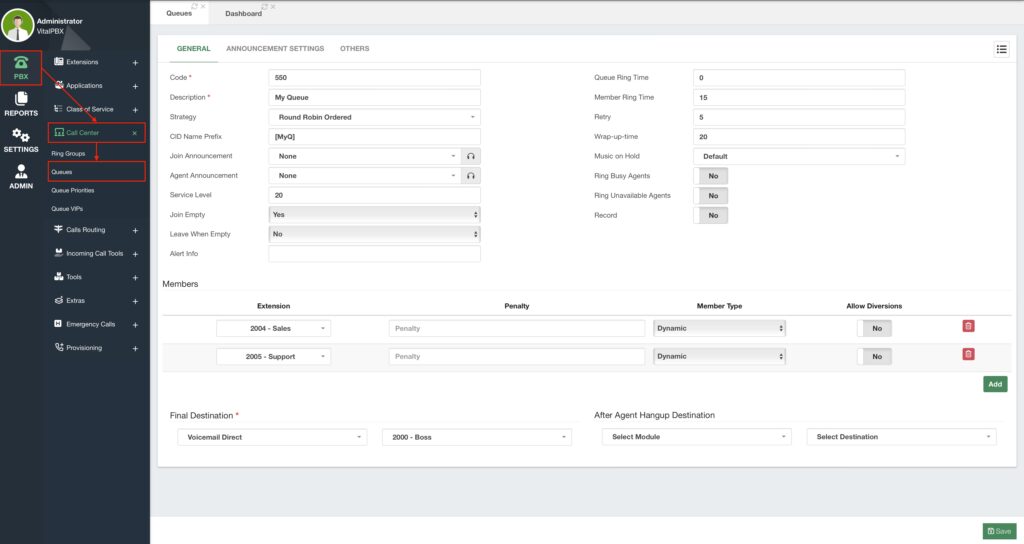
Now, let’s take a look into Queues. Queues are the basis for all inbound Call Centers. These will allow you to manage multiple calls and automatically assign them to available agents. queues in VitalPBX possess multiple tools that will allow you to manage incoming calls easily and effectively. To start creating queues we must go to PBX > Call Center > Queues.
The Queues module is comprised of multiple tabs, the General, Announcement
Settings, and Others tabs.
We will begin with the main configurations in the General tab. This contains the general configuration for our queues and here is where we add our Members also known as Agents in a queue.
First, we will add a Code to our queue. This is how we are able to call a queue internally. And we add a Description so we can identify it easily.
Next, we have our Ring Strategies. We must choose one of the following.
- Ring All – This will ring all the available agents at once. Note: that this is not a
recommended strategy if you want to have accurate statistics for your agent reports. - Least Recent – This will ring the agent with the least recent assigned call.
- Fewest Calls – This will ring the agent with the fewest calls assigned.
- Random – This strategy will ring any agent at random.
- Round Robin Memory – Calls will be assigned in order of login, and the queue will
remember which was the last agent assigned in the order. - Linear – This will ring the agents linearly in order of login. This strategy will always
begin with the first agent and only go to the next one if the agent is busy. - Weight Random – Will randomly ring an agent, based on their penalty.
- Round Robin Ordered – Will ring an agent in order of login. Will continue to the next
agent based on the previous agent rung.
It is very important you choose the ring strategy appropriately. This way calls are distributed as evenly as possible according to your operations. We recommend using any of the Round Robin options as these are the most fair among the agents.
Options like Least Recent and Fewest Calls may overwhelm a single agent with calls until they reach the number of calls answered by other agents. This is evident especially if you have mixed shifts where a new agent logs in and does not have the same amount of calls answered as the other available agents. With Linear, the first agent can get overwhelmed if they complete calls often, and all new calls will always be assigned to them. Linear is only recommended if you know that calls will last longer.
Afterward, you can add a CID Name Prefix. This will help the agent identify the queue, especially if they belong to multiple queues. Similarly, you can add an Agent Announcement, which will playback to the agent prior to connecting the call with the caller.
A Join Announcement is an audio that will playback to the caller when joining the queue. This is usually a welcome or disclaimer message that tells the caller the queue they have called into or that the call will be recorded for quality assurance and training purposes.
Next, we configure the Queue and Member Ring Time. Queue Ring Time is the time in seconds a caller will stay in the queue before going to the Final Destination, while the Member Ring Time is the time in seconds the call rings an agent before going to the next available agent respecting the ring strategy. If the Queue Ring Time is set to zero, the caller will wait indefinitely in queue until an agent answers the call. In between ringing members, the Retry time in seconds will be considered.
Then, we have the Wrap-Up Time. This is the time agents will have between getting calls assigned. During this time, agents will not get calls assigned allowing them some breathing time, and to wrap up any process from their previous call.
Afterward, we can start adding members to the Queue. Members have four aspects to configure.
- Extension – This is the user we will add as a member to our queue.
- Penalty – This is how we prioritize agents within a queue. Agents with a lower penalty
will be prioritized when assigning calls. Only when these agents are busy or
unavailable, agents with higher penalty will be considered. - Member Type – Agents can be either Static or Dynamic members. Static agents will
be permanently logged into a Queue, while Dynamic agents can log in or out of a
Queue. By default, agents will always be Dynamic. We recommend static agents
when you prioritize a device or cubicle assigned to a queue, rather than considering
individual agents. Dynamic agents will give more accurate statistical reports. - Allow Diversions – This will allow agents to enable call diversions like Do Not Disturb
and Call Forwarding.
You can add as many agents as you need to a queue, and remove them at any time.
Lastly, we have the Final Destination where the call will be sent if the members/agents do not answer the call in time. And the Destination After the Agent Hangs Up. If the agent hangs up first, you can send the call to another destination. This can be something like a satisfaction survey with a specific extension or an IVR tree using our IVR Stats commercial add-on. We will see more about IVR stats later.
With these configurations, you can Save and Apply Changes, and have a queue ready.
Additionally, you can configure the following.
- Service Level – This is used for statistic reports. This is the amount of time it takes
the agents to answer a call in the queue. - Join Empty – Allows the callers to join the queue when there are no agents. The
available options are: - Yes – If set to yes, this allows the callers to join the queue without agents.
- No – If set to no, callers cannot join the queues without agents.
- Strict – Callers cannot join a queue without agents or only unavailable agents.
Unavailable Agents mean that the agents are paused or busy. - Loose – Callers can join a queue without agents and the agents are
unavailable. - No + InUse – Callers cannot join a queue without agents or agents that are
busy on a call. - Leave Empty – This will kick callers out of the queue when the last agent leaves the
queue and the caller is still waiting in the queue. The available options are: - Yes – When set to yes, callers will be kicked out of the queue when the last
available agent leaves. - No – When set to no, callers will not be kicked out of the queue when the last
available agent leaves. - Strict – This will kick the callers from the queue when the last agent leaves or
becomes unavailable. An unavailable agent means that the agent is on a call
or on pause. - Loose – This is the same as strict, but paused queue agents will not be
considered as unavailable. - Yes + InUse – This will kick the caller from the queue when the last available
agent leaves or gets on a call. - Alert Info – This will add to the alert-info header so agent devices can have a different
ringtone. - Music on Hold – This is the Music on Hold class that plays back while the caller is in
the queue. - Ring Busy Agents – If enabled, this will ring agents even if they are on a call.
- Ring Unavailable Agents – If enabled, this will ring agents even if they are not
registered on the PBX. - Record – If enabled, this will record all the calls in the queue. Remember, if you
enable call recording in multiple stages of a call, be it in a trunk, inbound route, or at
an extension level, for example, multiple instances of the call will be recorded.
Next, we have the Announcement Settings we can add to our queue.
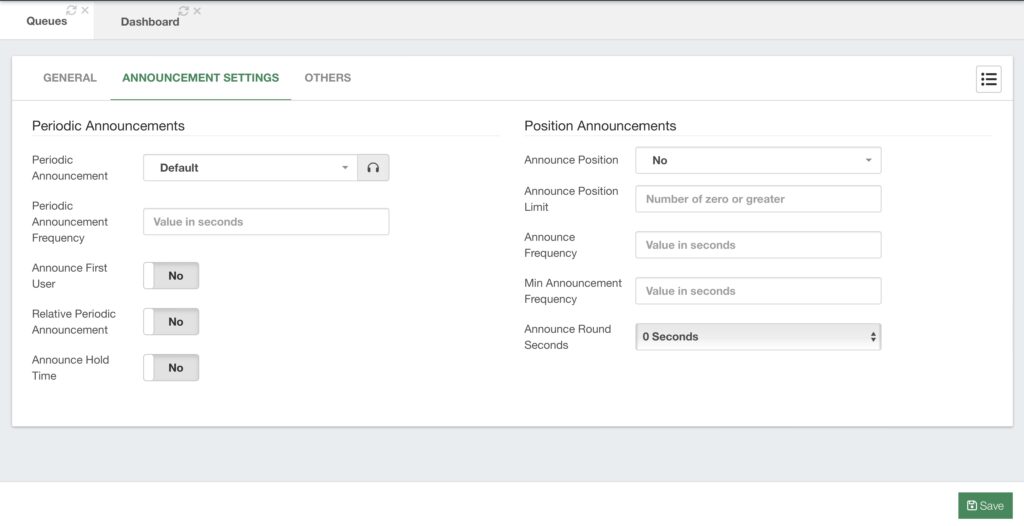
Here we can configure our Periodic Announcements. This includes a Periodic Announcement we can playback based on the Periodic Announcement Frequency. This is an audio that usually tells the caller that they are still in the queue and will be connected to the next available agent. We will see later how to upload these sound files.
Additionally, we have the following options.
- Announce First User – This option will tell the caller that they are the next in line.
- Relative Periodic Announcement – This option considers the length of the Periodic
Announcement, so the frequency is considered at the end of the periodic
announcement’s length. - Announce Hold Time – This will estimate the hold time based on previous calls, and
announce the time to the caller.
Then we have the Position Announcements, which include the following options.
- Announce Position – This lets you choose if you want to announce the position to the
caller. The available options are: - No – If the announce position is set to no, the queue position will not be
announced to the caller. - Yes – if set to yes, the queue position will be announced to the caller.
- Limit – if set to limit, the Announce Position Limit will be considered. The
position will be limited to the Announce Position Limit value. This means that if
the position of the caller exceeds the Announce Position Limit the queue
position will not be announced to the caller. - More – if set to more, this means that the position will be announced to the
caller if the Announce Position Limit is exceeded. - Announce Frequency – This is how often the position and hold time are announced
to the caller. In smaller Call Centers, it is more difficult to estimate the hold time for
callers. So this can be a frustrating feature in these smaller environments. By setting it
to 0 the feature is disabled. - Minimum Announcement Frequency – This defines the minimum amount of time
that must elapse before announcing the position or holding time again. This is used to
prevent these announcements from playing too often. - Announce Round Seconds – This is used to round the holding time if the time is non-zero. You can choose in intervals of 5 seconds between 0 and 50 seconds
Remember to Save and Apply Changes if you made any changes in this section.
Note: The Announce First User, Hold time, and Position can become a double-edged sword. We will see in a moment where you can add priority to other calls based on the queue or caller. So the estimations in holding time and queue position may change, and a caller can go from the first position to the second or their hold time may increase. This can frustrate the caller, so we recommend you use these features at your own discretion.
Finally, we have the Others tab for additional settings.
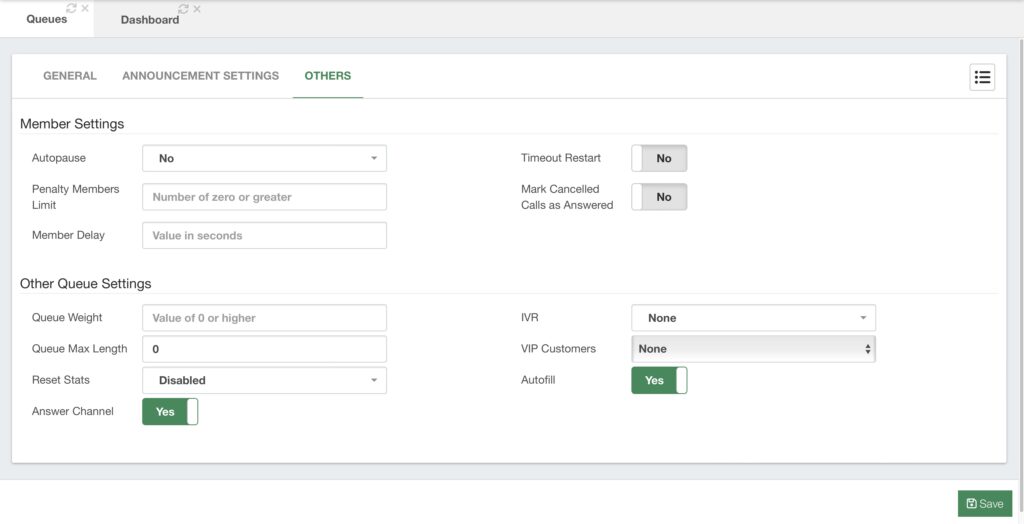
Here, we find the following Member Settings.
- Auto pause – This will pause the agents automatically in a queue if they do not
answer multiple calls in a row. You can choose between the following options. - Yes – Will pause the agent in this specific queue.
- No – Will not pause the agent even if they don’t answer incoming calls.
- All – This will pause the agent in all the queues they belong to.
- Penalty Members Limit – This option disregards the consideration of the agents’
penalty if there are too few members logged in the queue. No penalty is considered if
there are X or fewer agents in the queue. - Member Delay – This is a delay in seconds you can add before connecting the caller
with the agent. - Timeout Restart – Resets the timeout for an agent to answer if a BUSY or
CONGESTION status is received from the channel. This is useful if the agent is
allowed to reject or cancel a call. - Mark Cancelled Calls as Answered – This is useful if you are using the Ring All
strategy. This will mark calls that have been answered by one of the ringed members
as answered. Whereas if this is disabled, calls would be marked as missed.
Finally, we have Other Queue Settings that allow us the following.
- Queue Weight – If the agents belong to multiple queues, the queue weight gives
priority to calls from this queue over the others. - Queue Max Length – This is the number of callers that can be in a queue. A value of
0 means that there can be any number of callers waiting in the queue. - Reset Stats – For this feature, you need to create a cron job. We will learn more about
cron jobs later. This feature allows you to reset the current statistics for a queue. - Answer Channel – This feature is enabled by default. This allows the queue to answer
the incoming call. If it is disabled, calls will not be answered until an agent is available.
Notice that if this feature is disabled, no announcement or music on hold will play. - IVR – This allows you to set an IVR while the caller is waiting in the queue.
- VIP customers – This is a list of customers that have a higher priority over other
callers for this queue. - Autofill – With this feature enabled, the queue behaves more like a real queue. If there
are multiple agents available, multiple calls are assigned to those agents at the same
time
This was the last tab for the Queues module. As you can see this module is very extensive and allows you to make granular changes to your queues. Queues are the basis for any inbound call center and with VitalPBX you can create as many queues with as many agents as you need.


